Kapacitný dotykový snímač bez akéhokoľvek hardvéru
Zápisník experimentátora
Kapacitný senzor je možné vytvoriť aj priamo pomocou Arduina. Využíva sa pritom interný pull-up rezistor a sledovanie, času, za ktorý sa preklopí na pine logická hodnota. Takýto senzor je ale potrebné používať s rozumom, pretože nie je nijako chránený voči elektrostatickým výbojom.
Obsah toto článku je do veľkej miery inšpirovaný článkom na webe http://playground.arduino.cc/Code/CapacitiveSensor. Bol tam popisovaný postup, ako pomocou nabíjania a vybíjania pinu zistiť, či sa v blízkosti nachádza ľudský prst. Využíva sa pri tom skutočnosť, že ľudský prst v obvode pracuje ako kondenzátor a ovplyvňuje rýchlosť, akou sa pin dokáže nabíjať alebo vybíjať. Celý kód je napísaný pre Arduina, založené na 8bitových mikrokontroléroch. Čiže bude fungovať iba pre Arduino Uno alebo Mega, prípadne Arduino Pro Mini.
// readCapacitivePin
//  Input: Arduino pin number
//  Output: A number, from 0 to 17 expressing
//  how much capacitance is on the pin
//  When you touch the pin, or whatever you have
//  attached to it, the number will get higher

uint8_t readCapacitivePin(int pinToMeasure) {
  // Variables used to translate from Arduino to AVR pin naming
  volatile uint8_t* port;
  volatile uint8_t* ddr;
  volatile uint8_t* pin;

  // Here we translate the input pin number from
  // Arduino pin number to the AVR PORT, PIN, DDR,
  // and which bit of those registers we care about.
  byte bitmask;
  port = portOutputRegister(digitalPinToPort(pinToMeasure));
  ddr = portModeRegister(digitalPinToPort(pinToMeasure));
  bitmask = digitalPinToBitMask(pinToMeasure);
  pin = portInputRegister(digitalPinToPort(pinToMeasure));

  // Discharge the pin first by setting it low and output
  *port &= ~(bitmask);
  *ddr  |= bitmask;
  delay(1);
  uint8_t SREG_old = SREG; //back up the AVR Status Register

  // Prevent the timer IRQ from disturbing our measurement
  noInterrupts();

  // Make the pin an input with the internal pull-up on
  *ddr &= ~(bitmask);
  *port |= bitmask;

  // Now see how long the pin to get pulled up. This manual unrolling of the loop
  // decreases the number of hardware cycles between each read of the pin,
  // thus increasing sensitivity.
  uint8_t cycles = 17;
  if (*pin & bitmask) { cycles =  0;}
  else if (*pin & bitmask) { cycles =  1;}
  else if (*pin & bitmask) { cycles =  2;}
  else if (*pin & bitmask) { cycles =  3;}
  else if (*pin & bitmask) { cycles =  4;}
  else if (*pin & bitmask) { cycles =  5;}
  else if (*pin & bitmask) { cycles =  6;}
  else if (*pin & bitmask) { cycles =  7;}
  else if (*pin & bitmask) { cycles =  8;}
  else if (*pin & bitmask) { cycles =  9;}
  else if (*pin & bitmask) { cycles = 10;}
  else if (*pin & bitmask) { cycles = 11;}
  else if (*pin & bitmask) { cycles = 12;}
  else if (*pin & bitmask) { cycles = 13;}
  else if (*pin & bitmask) { cycles = 14;}
  else if (*pin & bitmask) { cycles = 15;}
  else if (*pin & bitmask) { cycles = 16;}

  // End of timing-critical section; turn interrupts back on if they were on before, or leave them off if they were off before
  SREG = SREG_old;

  // Discharge the pin again by setting it low and output
  //  It's important to leave the pins low if you want to
  //  be able to touch more than 1 sensor at a time - if
  //  the sensor is left pulled high, when you touch
  //  two sensors, your body will transfer the charge between
  //  sensors.
  *port &= ~(bitmask);
  *ddr  |= bitmask;

  return cycles;
}
Poďme si popísať, čo sa v kóde deje. Ak rozumiete anglicky, môžete si prečítať aj poznámky v kóde.
- Definícia štyroch premenných - Do týchto štyroch premenných sa vypočítajú priamo registre a bitové masky, aby bol celý algoritmus rýchlejší. Kód, ktorý tieto výpočty robí, nájdete v mnohých funkciách pre Arduino. Obľúbený je napríklad v triedach, ktoré obsluhujú nejaký hardvér, pripojený na konkrétne porty. Ak je ten hardvér pravidelne ovládaný, je výhodné si tieto údaje vypočítať iba raz, uložiť ich interne v triede a používať už len vypočítané registre.
- Vybitie pinu - Použitý kód na jednu milisekundu prepne pin na hodnotu LOW, čo zabezpečí dokonalé vybitie.
- Vypnutie prerušení - Prerušenia by mohli negatívne ovplyvniť výpočet času, počas ktorého sa bude pin nabíjať.
- Prepnutie pinu na vstup s interným pull-upom - Toto pripojí pin na +5 V cez interný rezistor s hodnotou približne 20-50k. Čiže sa bude pomaly nabíjať. Rýchlosť nabíjania je ovplyvňovaná blízkosťou ľudského prstu.
- Meranie doby, kým sa hodnota na pine nezmení na HIGH - Aj keď je pin vstupný, môžeme na ňom kedykoľvek odmerať logickú hodnotu. Tento kód iba preriodicky skúma počas istého časového úseku, kedy sa hodnota preklopí. Bude to trvať iba pár inštrukcií a preto je kód napísaný maximálne úsporne.
- Vybitie pinu - Na záver sa pin opäť pripojí na GND.
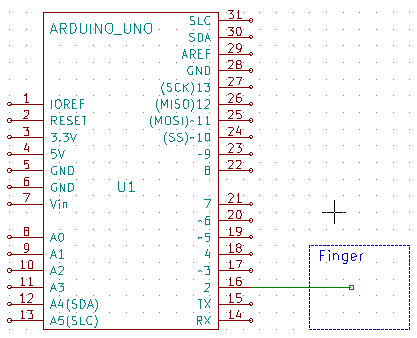
Schéma obvodu
Základná schéma je veľmi jednoduchá. Naozaj nie je potrebný žiaden dodatočný hardvér.
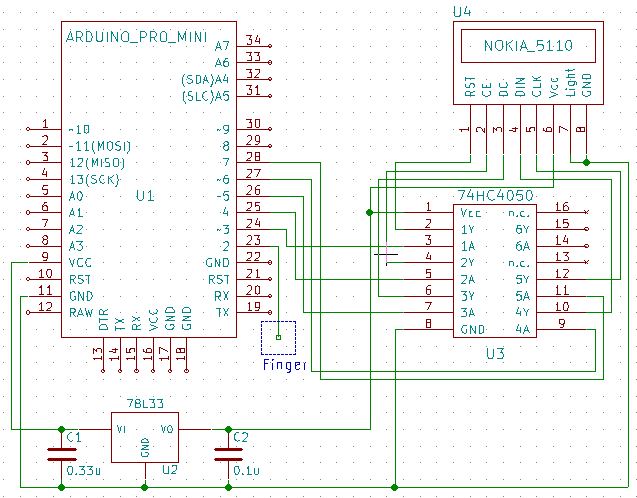
Video
Video ku článku je na YouTube. Vo videu je dobre vidno, ako pri dotyku rastie intenzita signálu. Signál je zobrazovaný na displeji Nokia 5110.
Zdrojový kód
Zdrojový kód si môžete stiahnuť zo stránky na GitHub.
03.07.2016