Získání údajů o počasí pomocí ESP8266
Zápisník experimentátora
Hierarchy: ESP8266
V tomto článku si ukážeme, jak lze stáhnout online údaje o počasi pomocí mikrokontroléru ESP8266. Využijeme na to server openweathermap.org. Programovat budeme v Arduino IDE. Toto je druhý článek v sérii, která zahrnuje Node.js, ESP8266 a Arduino MKR1000. V tomto článku si ukážeme tři příklady. V příkladech si ukážeme jednoduché stažení odpovědi ze serveru ve formátu JSON a výpis na sériový port. V posledním příkladu si vytvoříme malou meteorologickou stanici pomocí OLED displeje.
openweathermap.org
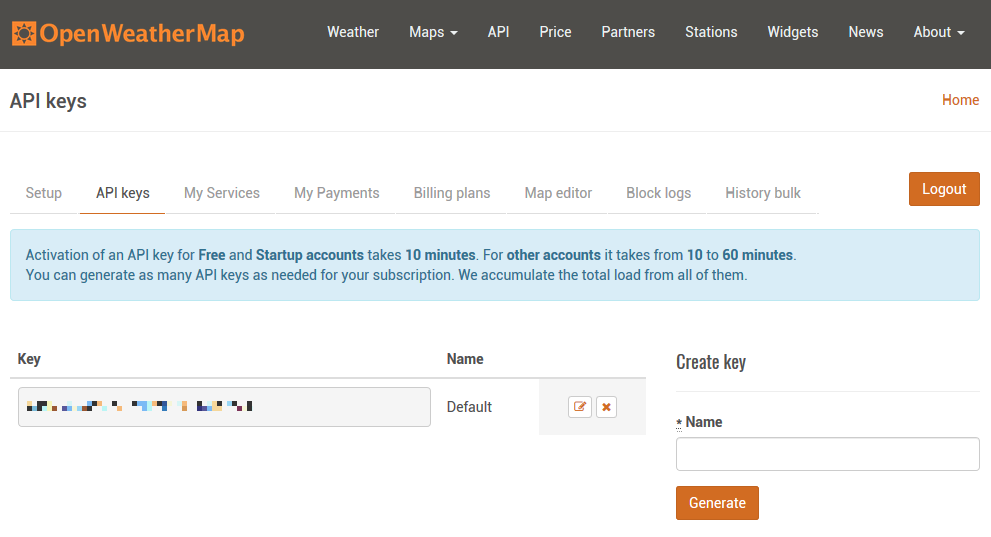
Tento server poskytuje údaje o počasi. Můžete se na serveru zaregistrovat a pak získat klíč k API, pomocí kterého si můžete ze serveru stáhnout údaje o počasi a využít je pro vlastní účely. Registrace je bezplatná, pokud se spokojíte se základními funkcemi API. Přesný seznam poskytovaných služeb najdete na stránce openweathermap.org/price.
Pro naši ukázku budeme využívat funkci API Current weather data. Její kompletní popis naleznete na stránce openweathermap.org/current. Budeme používat dvě funkce.
- By city name - Funkci zavoláte s parametrem vašeho města a získáte údaje o počasi.
- By city ID - Funkci zavoláte s identifikátorem vašeho města a získáte údaje o počasi. Identifikátor získáte na stránce tak, že si dáte vyhledat vaše město a podíváte si parametr v URL. Například.
- Banská Bystrica - openweathermap.org/city/3061186
- Zvolen - openweathermap.org/city/3056459
Server vrátí údaje o počasi ve formátu JSON. Pomocí parametrů můžete nastavit některé údaje. Můžete měnit například zobrazení teploty ve stupních Kelvina, Celsia nebo ve Fahrenheitech. Vrácené údaje vypadají takto.
{ coord: { lon: 19.15, lat: 48.74 },
  weather:
   [ { id: 801,
       main: 'Clouds',
       description: 'few clouds',
       icon: '02n' } ],
  base: 'stations',
  main:
   { temp: 19.43,
     pressure: 1011,
     humidity: 64,
     temp_min: 19,
     temp_max: 20 },
  visibility: 10000,
  wind: { speed: 0.5 },
  clouds: { all: 20 },
  dt: 1525030200,
  sys:
   { type: 1,
     id: 5909,
     message: 0.004,
     country: 'SK',
     sunrise: 1524972341,
     sunset: 1525024594 },
  id: 3061186,
  name: 'Banska Bystrica',
  cod: 200 }
Použité díly
V článku jsou použity následující díly:
- NodeMCU 0.9 (link) - Ale raději si kupujte verzi 1.0.
- 7pin 0.96 in SPI OLED 128x64 White (link) - Podstatné je, aby byl displej označený jako SPI. Tyto jsou výrazně rychleji než I2C verze. Prodávají se ve třech barevných modifikacích. Bílé, modré a dvoubarevné. Displej snese napětí 5 V.
- Breadboard (link) - Používám dva miniaturní, protože NodeMCU 0,9 se na normální breadboard nevejde. Dva miniaturní ale mají svou výhodu při zapojování, což je pěkně vidět na fotografii.
Propojení mezi piny je následující.
| NodeMCU | OLED |
|---|---|
| D1 | D0 |
| D2 | D1 |
| D3 | RES |
| D4 | DC |
| D5 | CS |
| GND | GND |
| 3V3 | VCC |
Použité knižnice
Použil jsem:
- Jádro pro ESP8266 ve verzi 2.4.1 a 2.3.0. Starší jádro jsem musel použít ve třetím příkladu, kde se využívá OLED displej.
- Arduino JSON - https://github.com/bblanchon/ArduinoJson
- U8g2 - https://github.com/olikraus/u8g2
Programy
Napsal jsem tři vzorové příklady. Chtěl jsem pomocí nich ukázat, jak postupně vyvíjíme program od jednoduché funkce až po komplexnější příklad, který řeší více funkcí najednou.
Výpis na sériový port
První příklad vypisuje získané údaje ze serveru na sériový port. Nejprve si definujeme několik konstant pro API. Další konstanty se nacházejí v souboru arduino_secret.h, který zde není uveden. Najdete ho na GitHub a obsahuje definice připojení k WiFi. Výsledkem je proměnná param, která obsahuje celou URL, kterou budeme na server odesílat protokolem HTTPS a metodou GET.
Pro připojení k serveru používáme třídu WiFiClientSecure. Třída obsahuje i možnost verifikace HTTPS certifikátu, ale tyto funkce jsem nepoužil. Není to nutné, protože v tomto příkladu se nehrajeme na tajné agenty s paranoiou. Spokojíme se s tím, že máme šifrované spojení a věříme tomu, že na druhé straně s námi komunikuje správný server.
Za zasláním požadavku vidíte kód, který nejprve zkontroluje správnost záhlaví v odpovědi, najde konec hlavičky pomocí příkazu client.find ("\r\n\r\n") a pomocí třídy DynamicJsonBuffer si stáhne tělo odpovědi ze serveru. Odpověď je zformátována a funkcí prettyPrintTo odeslána na sériový port.
#include <ESP8266WiFi.h>
#include <WiFiClientSecure.h>
#include <ArduinoJson.h>
#include "arduino_secret.h"

const char* host = "api.openweathermap.org";
const int httpsPort = 443;
const char* url = "/data/2.5/weather";
const char* openweathermapid = "3061186"; // Banska Bystrica
const char* openweathermapq = "Banska%20Bystrica"; // Banska Bystrica
const char* openweathermapunits = "metric"; // Celsius

//String param = String(url) +
//               "?id=" + openweathermapid +
//               "&units=" + openweathermapunits +
//               "&APPID=" + APPID;

String param = String(url) +
               "?q=" + openweathermapq +
               "&units=" + openweathermapunits +
               "&APPID=" + APPID;

String line;

void setup() {
  Serial.begin(115200);
  Serial.println();
  Serial.print("connecting to ");
  Serial.println(ssid);
  WiFi.mode(WIFI_STA);
  WiFi.begin(ssid, password);
  while (WiFi.status() != WL_CONNECTED) {
    delay(500);
    Serial.print(".");
  }
  Serial.println("");
  Serial.println("WiFi connected");
  Serial.println("IP address: ");
  Serial.println(WiFi.localIP());

  // Use WiFiClientSecure class to create TLS connection
  WiFiClientSecure client;
  Serial.print("connecting to ");
  Serial.println(host);
  if (!client.connect(host, httpsPort)) {
    Serial.println("connection failed");
    return;
  }

  Serial.print("requesting URL: ");
  Serial.println(url);

  client.print(String("GET ") + param + " HTTP/1.1\r\n" +
               "Host: " + host + "\r\n" +
               "User-Agent: ESP8266\r\n" +
               "Connection: close\r\n\r\n");

  Serial.println("request sent");

  line = client.readStringUntil('\n');
  if (line != "HTTP/1.1 200 OK\r") {
    Serial.print("Unexpected response: ");
    Serial.println(line);
    return;
  }

  if (client.find("\r\n\r\n")) {
    DynamicJsonBuffer jsonBuffer(4096);
    JsonObject& root = jsonBuffer.parseObject(client);
    root.prettyPrintTo(Serial);
  }
}

void loop() {
}
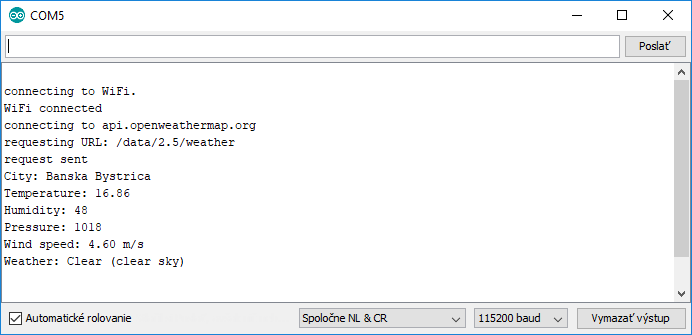
Parsování JSON
Začátek druhého programu je identický s prvním programem. Liší se pouze konec, kde jsou parsované údaje o počasí. Všechny funkce vypadají velmi podobně. Například teplota získáme příkazem const double temp = root ["main"] ["temp"];. Některé údaje jsou ve formě reálného čísla a proto se jejich výpis na sériový port může lišit. Verze jádra 2.3.0 musí používat funkci dtostrf. Verze jádra 2.4.1 může použít funkci printf.
#include <ESP8266WiFi.h>
#include <WiFiClientSecure.h>
#include <ArduinoJson.h>
#include "arduino_secret.h"

const char* host = "api.openweathermap.org";
const int httpsPort = 443;
const char* url = "/data/2.5/weather";
const char* openweathermapid = "3061186"; // Banska Bystrica
const char* openweathermapq = "Banska%20Bystrica"; // Banska Bystrica
const char* openweathermapunits = "metric"; // Celsius

//String param = String(url) +
//               "?id=" + openweathermapid +
//               "&units=" + openweathermapunits +
//               "&APPID=" + APPID;

String param = String(url) +
               "?q=" + openweathermapq +
               "&units=" + openweathermapunits +
               "&APPID=" + APPID;

String line;

void setup() {
  Serial.begin(115200);
  Serial.println();
  Serial.print("connecting to WiFi");
  //Serial.println(ssid);
  WiFi.mode(WIFI_STA);
  WiFi.begin(ssid, password);
  while (WiFi.status() != WL_CONNECTED) {
    delay(500);
    Serial.print(".");
  }
  Serial.println("");
  Serial.println("WiFi connected");
  //Serial.println("IP address: ");
  //Serial.println(WiFi.localIP());

  // Use WiFiClientSecure class to create TLS connection
  WiFiClientSecure client;
  Serial.print("connecting to ");
  Serial.println(host);
  if (!client.connect(host, httpsPort)) {
    Serial.println("connection failed");
    return;
  }

  Serial.print("requesting URL: ");
  Serial.println(url);

  client.print(String("GET ") + param + " HTTP/1.1\r\n" +
               "Host: " + host + "\r\n" +
               "User-Agent: ESP8266\r\n" +
               "Connection: close\r\n\r\n");

  Serial.println("request sent");

  line = client.readStringUntil('\n');
  if (line != "HTTP/1.1 200 OK\r") {
    Serial.print("Unexpected response: ");
    Serial.println(line);
    return;
  }

  if (client.find("\r\n\r\n")) {
    DynamicJsonBuffer jsonBuffer(4096);
    JsonObject& root = jsonBuffer.parseObject(client);
    //root.prettyPrintTo(Serial);

    // parsed output
    const char* name = root["name"];
    Serial.print("City: ");Serial.println(name);

    const double temp = root["main"]["temp"];
    char buffer[64];
    sprintf(buffer, "Temperature: %.02f", temp);
    Serial.println(buffer);

    const int humidity = root["main"]["humidity"];
    sprintf(buffer, "Humidity: %d", humidity);
    Serial.println(buffer);

    const int pressure = root["main"]["pressure"];
    sprintf(buffer, "Pressure: %d", pressure);
    Serial.println(buffer);

    const double wind = root["wind"]["speed"];
    sprintf(buffer, "Wind speed: %.02f m/s", wind);
    Serial.println(buffer);

    const char* weather = root["weather"][0]["main"];
    const char* description = root["weather"][0]["description"];
    sprintf(buffer, "Weather: %s (%s)", weather, description);
    Serial.println(buffer);
  }
}

void loop() {
}
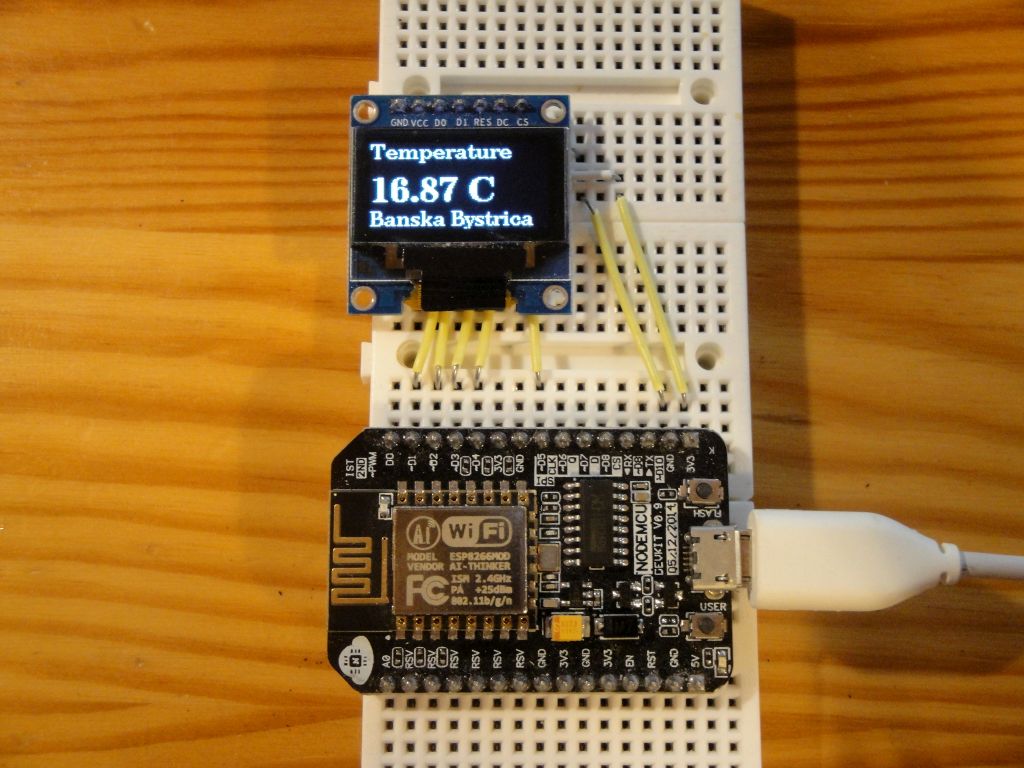
OLED displej
Poslední příklad využívá OLED displej. Na displeji rotuje několik hodnot o počasí. Program je příkladem stavového automatu, který si stahuje aktuální data ze serveru a rotuje je na OLED displeji. To je zajištěno pomocí dvou enum. V enum oledState je stavový automat, který se stará o stahování dat ze serveru. V enum temperatureState je stavový automat, který se stará o zobrazení údajů.
V programu jsem použil několik funkcí, aby byl program přehlednější.
loop- Funkce kontroluje připojení k WiFi a podle toho se rozhoduje, zda se má zase připojit nebo zobrazovat údaje na OLED displeji.connectWiFi- Funkce zajišťuje připojení k WiFi.showTemperature- Funkce jednou za dvě minuty stáhne nové údaje o počasi a ovládá stavový automat na zobrazení údajů na displeji.downloadData- Funkce stáhne ze serveru nové údaje o počasí. Popis stažení se nachází v předchozích příkladech.drawFrame- Vykreslení údajů na displeji. Podle stavového automatu se kreslí příslušná obrazovka.
Tento příklad funguje pouze pro jádro 2.3.0. Jádro 2.4.1 se nedokáže připojit k WiFi, jakmile je použita funkce na inicializaci OLED displeje. Neměl jsem dost času na zkoumání problému, takže nevím, jestli je problém na straně ESP8266 nebo v knihovně U8g2.
#include <ESP8266WiFi.h>
#include <WiFiClientSecure.h>
#include <ArduinoJson.h>
#include <U8g2lib.h>
#include "arduino_secret.h"

U8G2_SSD1306_128X64_NONAME_F_4W_SW_SPI u8g2(U8G2_R0, /* clock=*/ D1, /* data=*/ D2, /* cs=*/ D5, /* dc=*/ D4, /* reset=*/ D3);
enum oledState {oledBoot, oledConnected, oledRequest, oledParsed, oledError};
enum temperatureState {tempTemperature, tempHumidity, tempPressure, tempWind};
int bootCount = 0;
temperatureState tstate = tempTemperature;
int tick = 0;

struct myTemperature {
  double temperature;
  int humidity;
  int pressure;
  double wind;
  char city[64];
};
myTemperature my_temperature;
char buff[64];

const char* host = "api.openweathermap.org";
const int httpsPort = 443;
const char* url = "/data/2.5/weather";
const char* openweathermapid = "3061186"; // Banska Bystrica
const char* openweathermapq = "Banska%20Bystrica"; // Banska Bystrica
const char* openweathermapunits = "metric"; // Celsius

//String param = String(url) +
//               "?id=" + openweathermapid +
//               "&units=" + openweathermapunits +
//               "&APPID=" + APPID;

String param = String(url) +
               "?q=" + openweathermapq +
               "&units=" + openweathermapunits +
               "&APPID=" + APPID;

String line;

void setup() {
  Serial.begin(115200);
  delay(10);
  Serial.println();
  Serial.print("connecting to WiFi ");
  Serial.println(ssid);

  u8g2.begin();

  WiFi.mode(WIFI_STA);
}

void loop() {
  if (WiFi.status() != WL_CONNECTED)
    connectWiFi();
  else
    showTemperature();
}

void connectWiFi() {
  bootCount = 0;
  WiFi.begin(ssid, password);
  while (WiFi.status() != WL_CONNECTED) {
    delay(500);
    Serial.print(".");
    bootCount++;
    if (bootCount % 25 == 0)
      Serial.println();
    drawFrame(oledBoot);
  }
  drawFrame(oledConnected);
  Serial.println("");
  Serial.println("WiFi connected");
  Serial.println("IP address: ");
  Serial.println(WiFi.localIP());
}

void showTemperature() {
  if (tick % 60 == 0) { // once per 2 minutes
    downloadData();
  }
  tick++;
  drawFrame(oledParsed);
  delay(2000);
  switch (tstate) {
    case tempTemperature:
      tstate = tempHumidity;
      break;
    case tempHumidity:
      tstate = tempPressure;
      break;
    case tempPressure:
      tstate = tempWind;
      break;
    case tempWind:
      tstate = tempTemperature;
      break;
  }
}

void downloadData() {

  // Use WiFiClientSecure class to create TLS connection
  WiFiClientSecure client;
  Serial.print("connecting to ");
  Serial.println(host);
  if (!client.connect(host, httpsPort)) {
    Serial.println("connection failed");
    drawFrame(oledError);
    return;
  }

  drawFrame(oledRequest);
  Serial.print("requesting URL: ");
  Serial.println(url);

  client.print(String("GET ") + param + " HTTP/1.1\r\n" +
               "Host: " + host + "\r\n" +
               "User-Agent: ESP8266\r\n" +
               "Connection: close\r\n\r\n");

  Serial.println("request sent");

  line = client.readStringUntil('\n');
  if (line != "HTTP/1.1 200 OK\r") {
    Serial.print("Unexpected response: ");
    Serial.println(line);
    drawFrame(oledError);
    return;
  }

  if (client.find("\r\n\r\n")) {
    DynamicJsonBuffer jsonBuffer(4096);
    JsonObject& root = jsonBuffer.parseObject(client);
    //root.prettyPrintTo(Serial);

    // parsed output
    const char* name = root["name"];
    strcpy(my_temperature.city, name);
    Serial.print("City: "); Serial.println(name);

    my_temperature.temperature = root["main"]["temp"];
    //sprintf(buff, "Temperature: %.02f", my_temperature.temperature);
    dtostrf(my_temperature.temperature, 2, 2, buff);
    Serial.print("Temperature: ");
    Serial.println(buff);

    my_temperature.humidity = root["main"]["humidity"];
    sprintf(buff, "Humidity: %d", my_temperature.humidity);
    Serial.println(buff);

    my_temperature.pressure = root["main"]["pressure"];
    sprintf(buff, "Pressure: %d", my_temperature.pressure);
    Serial.println(buff);

    my_temperature.wind = root["wind"]["speed"];
    //sprintf(buff, "Wind speed: %.02f m/s", my_temperature.wind);
    dtostrf(my_temperature.wind, 2, 1, buff);
    strcat(buff, " m/s");
    Serial.print("Wind speed: ");
    Serial.println(buff);

    const char* weather = root["weather"][0]["main"];
    const char* description = root["weather"][0]["description"];
    sprintf(buff, "Weather: %s (%s)", weather, description);
    Serial.println(buff);
  }

}

void drawFrame(oledState state) {
  u8g2.clearBuffer();
  u8g2.setFont(u8g2_font_ncenB10_tr);
  switch (state) {
    case oledBoot:
      sprintf(buff, "boot(%d)...", bootCount);
      u8g2.drawStr(0, 32, buff);
      break;
    case oledConnected:
      sprintf(buff, "connected...");
      u8g2.drawStr(0, 32, buff);
      break;
    case oledRequest:
      sprintf(buff, "request...");
      u8g2.drawStr(0, 32, buff);
      break;
    case oledParsed:
      switch (tstate) {
        case tempTemperature:
          sprintf(buff, "Temperature");
          u8g2.drawStr(0, 12, buff);
          u8g2.drawStr(0, 62, my_temperature.city);
          //sprintf(buff, "%.02f", my_temperature.temperature);
          dtostrf(my_temperature.temperature, 2, 2, buff);
          strcat(buff, " C");
          u8g2.setFont(u8g2_font_ncenB18_tr);
          u8g2.drawStr(0, 44, buff);
          break;
        case tempHumidity:
          sprintf(buff, "Humidity");
          u8g2.drawStr(0, 12, buff);
          u8g2.drawStr(0, 62, my_temperature.city);
          sprintf(buff, "%d %%", my_temperature.humidity);
          u8g2.setFont(u8g2_font_ncenB18_tr);
          u8g2.drawStr(0, 44, buff);
          break;
        case tempPressure:
          sprintf(buff, "Pressure");
          u8g2.drawStr(0, 12, buff);
          u8g2.drawStr(0, 62, my_temperature.city);
          sprintf(buff, "%d hpa", my_temperature.pressure);
          u8g2.setFont(u8g2_font_ncenB18_tr);
          u8g2.drawStr(0, 44, buff);
          break;
        case tempWind:
          sprintf(buff, "Wind");
          u8g2.drawStr(0, 12, buff);
          u8g2.drawStr(0, 62, my_temperature.city);
          //sprintf(buff, "%1.1f m/s", my_temperature.wind);
          dtostrf(my_temperature.wind, 2, 1, buff);
          strcat(buff, " m/s");
          u8g2.setFont(u8g2_font_ncenB18_tr);
          u8g2.drawStr(0, 44, buff);
          break;
      }
      break;
  }
  u8g2.sendBuffer();
}
Video
Video se nachází na serveru YouTube.
Zdrojový kód
Zdrojový kód se nachází na serveru GitHub.
Video
26.05.2018