I2C tester
Zápisník experimentátora
Hierarchy: I2C
I2C tester je užitečná pomůcka pro každého, kdo připojuje k Arduinu nové I2C zařízení. Pomocí něj se snadno zkontroluje, zda I2C komunikace funguje. Většina z nás využívá I2C tester ze stránek Arduina. Před pár dny jsem natrefil na podobný tester, ale s přehledněji uspořádaným výstupem. Jmenuje se i2cdetect a je využíván na jednodeskových počítačích typu Raspberry Pi nebo Orange Pi. Toto je adaptace programu do prostředí Arduina.
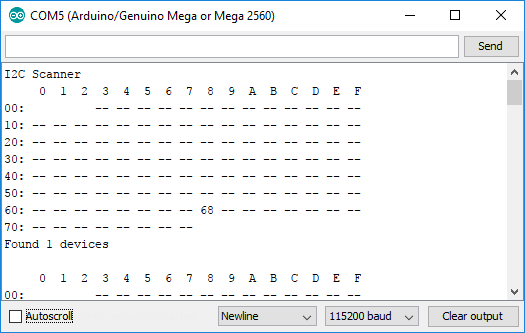
Program jsem napsal podle obrázku, který jsem našel na Internetu. Napodobil jsem výstup na sériový port tak, aby se podobal na původní program.
#include <Wire.h>

void setup() {
  Wire.begin();

  Serial.begin(115200);
  Serial.println("I2C Scanner");
}

void loop() {
  uint8_t error, address, line = 1;
  int nDevices = 0;

  Serial.println("     0  1  2  3  4  5  6  7  8  9  A  B  C  D  E  F");
  Serial.print  ("00:         ");

  // https://learn.adafruit.com/i2c-addresses/the-list
  for (address = 0x03; address < 0x78; address++ ) {
    // The i2c_scanner uses the return value of
    // the Write.endTransmisstion to see if
    // a device did acknowledge to the address.
    Wire.beginTransmission(address);
    error = Wire.endTransmission();

    if (error == 0) {
      printHex(address);
      nDevices++;
    }
    else if (error == 4)
      Serial.print(" ER");
    else
      Serial.print(" --");

    if ((address + 1) % 16 == 0) {
      Serial.println();
      Serial.print(line);
      Serial.print("0:");
      line++;
    }

  }
  if (nDevices == 0)
    Serial.println("\nNo I2C devices found\n");
  else {
    Serial.print("\nFound ");
    Serial.print(nDevices);
    Serial.println(" devices\n");
  }

  delay(5000);           // wait 5 seconds for next scan
}

void printHex(uint8_t address) {
  Serial.print(" ");
  if (address < 16)
    Serial.print("0");
  Serial.print(address, HEX);
}
Zdrojový kód
Zdrojový kód se nachází na serveru GitHub.
08.10.2017