I2C tester
Zápisník experimentátora
Hierarchy: I2C
The I2C tester is a useful tool for anyone who connects the new I2C device to Arduino. It makes it easy to check if I2C communication works. Most of us use the I2C tester from the Arduino site. A few days ago I found a similar tester, but with a more clearly arranged output. It is called i2cdetect and is used on single-computer computers such as Raspberry Pi or Orange Pi. This is the adaptation of the program to the Arduino environment.
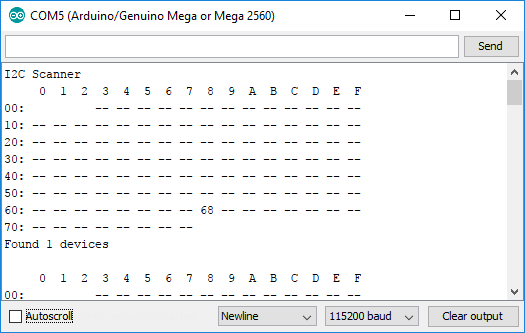
I wrote the program according to the image I found on the Internet. I imitated the output to the serial port to resemble the original program.
#include <Wire.h>

void setup() {
  Wire.begin();

  Serial.begin(115200);
  Serial.println("I2C Scanner");
}

void loop() {
  uint8_t error, address, line = 1;
  int nDevices = 0;

  Serial.println("     0  1  2  3  4  5  6  7  8  9  A  B  C  D  E  F");
  Serial.print  ("00:         ");

  // https://learn.adafruit.com/i2c-addresses/the-list
  for (address = 0x03; address < 0x78; address++ ) {
    // The i2c_scanner uses the return value of
    // the Write.endTransmisstion to see if
    // a device did acknowledge to the address.
    Wire.beginTransmission(address);
    error = Wire.endTransmission();

    if (error == 0) {
      printHex(address);
      nDevices++;
    }
    else if (error == 4)
      Serial.print(" ER");
    else
      Serial.print(" --");

    if ((address + 1) % 16 == 0) {
      Serial.println();
      Serial.print(line);
      Serial.print("0:");
      line++;
    }

  }
  if (nDevices == 0)
    Serial.println("\nNo I2C devices found\n");
  else {
    Serial.print("\nFound ");
    Serial.print(nDevices);
    Serial.println(" devices\n");
  }

  delay(5000);           // wait 5 seconds for next scan
}

void printHex(uint8_t address) {
  Serial.print(" ");
  if (address < 16)
    Serial.print("0");
  Serial.print(address, HEX);
}
Source code
The source code is located on the GitHub server.
08.10.2017