NeoPixel Ring HSV test
Zápisník experimentátora
Hierarchy: WS2812
The NeoPixel Ring contains at each point three LEDs that make up a pixel. The resulting color is set using three RGB components. Such coloring is complicated for man, because not everyone can imagine the resulting color, which consists of three components. To facilitate color adjustment, a HSV (hue, saturation, value) model is used to mix these colors with:
- Hue - Color shade.
- Saturation - Saturation of color. It appears on the model as if you were mixing white with color.
- Value - Brightness value. It appears on the model as if you were mixing the color with black.
In this article, we will try to set up the NeoPixel Ring using the HSV model. For each component of the HSV model we will write a sample program that will display it.
Used parts
- Arduino Uno - You can use any version of the Arduino.
- NeoPixel Ring 24 LED (link) - Includes 24 RGB LEDs with WS2812B chip.
- Resistor 1k (link) - The resistor is attached to the NeoPixel Ring data input. It serves as a pin protection.
- Capacitor 220 uF (link) - The capacitor is connected between VCC and GND on NeoPixel Ringu. It is used to straighten the voltage peaks.
Protective components are necessary in order to not damage NeoPixel Ring. Details of protection are in article on powering these diodes.
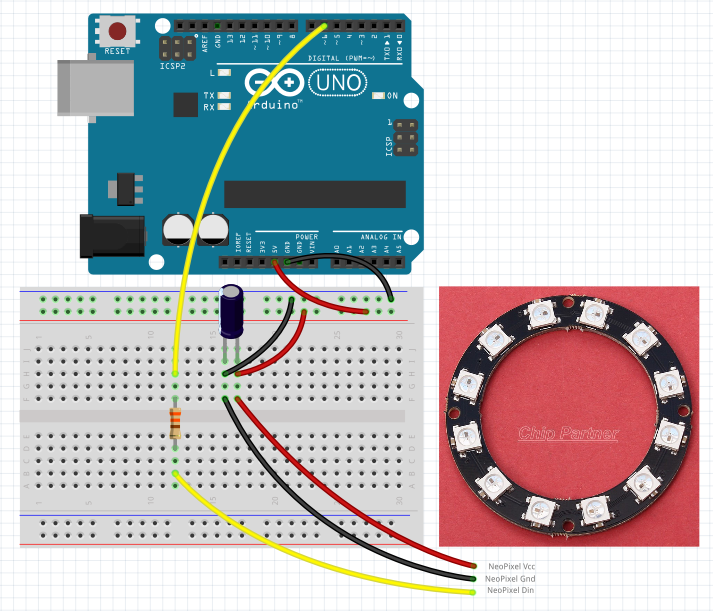
The picture shows a ring with 12 diodes. Ring with 24 diodes is not very different from it and it is therefore possible to use a smaller ring after minor changes in the sketch.
Hue
In this example, individual color shades appear on the NeoPixel Ring. The color shade is set in the range 0-MAXHUE. Saturation is set to the maximum value and the brightness has a minimum value to make the best possible conditions for taking pictures. Color distribution to individual pixels is done using the simple formula i * (MAXHUE / CNT). Function getPixelColorHsv is explained at the end of this article.
#include <Adafruit_NeoPixel.h>
#include "hsv.h"

// data pin
#define PIN 6
// led count
#define CNT 24
// max Hue
#define MAXHUE 256*6

Adafruit_NeoPixel strip = Adafruit_NeoPixel(CNT, PIN, NEO_GRB + NEO_KHZ800);

void setup() {
  strip.begin();
  // hue - whole circle
  // saturation - maximum
  // value - very low
  for (int i = 0; i < CNT; i++)
    strip.setPixelColor(i, getPixelColorHsv(i, i * (MAXHUE / CNT), 255, 10));
  strip.show();
}

void loop() {
}
![]()
Saturation
We will use two examples. In one, we set the NeoPixel Ring to a different saturation of red color. In the second example, we adjust the saturation with the gamma correction.
No gamma correction
Saturation of color without gamma correction occurs along the NeoPixel Ring circuit so that the red color changes very quickly to white and the human eye can not recognize any differences in the remaining pixels.
#include <Adafruit_NeoPixel.h>
#include "hsv.h"

// data pin
#define PIN 6
// led count
#define CNT 24
// max Hue
#define MAXHUE 256*6

Adafruit_NeoPixel strip = Adafruit_NeoPixel(CNT, PIN, NEO_GRB + NEO_KHZ800);

void setup() {
  strip.begin();
  // hue - red
  // saturation - 255-0
  // value - low
  for (int i = 0; i < CNT; i++)
    strip.setPixelColor(i, getPixelColorHsv(i, 0, 255-i*(255/CNT), 100));
  strip.show();
}

void loop() {
}
![]()
With gamma correction
With the gamma correction, the result is significantly better and the human eye sees a gradual change from red to white across the NeoPixel Ring circuit.
#include <Adafruit_NeoPixel.h>
#include "hsv.h"

// data pin
#define PIN 6
// led count
#define CNT 24
// max Hue
#define MAXHUE 256*6

Adafruit_NeoPixel strip = Adafruit_NeoPixel(CNT, PIN, NEO_GRB + NEO_KHZ800);

void setup() {
  strip.begin();
  // hue - red
  // saturation - 255-0
  // value - low
  for (int i = 0; i < CNT; i++)
    strip.setPixelColor(i, getPixelColorHsv(i, 0, 255-strip.gamma8(i*(255/CNT)), 100));
  strip.show();
}

void loop() {
}
![]()
Value
We will use two examples. In one, we set the NeoPixel Ring to a different brightness of red color. In the second example, we adjust the brightness value by using the gamma correction.
No gamma correction
Even in this case, the human eye has the problem of recognizing changes in brightness. The NeoPixel Ring color changes very quickly from black to red and can not see any change on most pixels.
#include <Adafruit_NeoPixel.h>
#include "hsv.h"

// data pin
#define PIN 6
// led count
#define CNT 24
// max Hue
#define MAXHUE 256*6

Adafruit_NeoPixel strip = Adafruit_NeoPixel(CNT, PIN, NEO_GRB + NEO_KHZ800);

void setup() {
  strip.begin();
  // hue - red
  // saturation - max
  // value - 0-255
  for (int i = 0; i < CNT; i++)
    strip.setPixelColor(i, getPixelColorHsv(i, 0, 255, i*(255/CNT)));
  strip.show();
}

void loop() {
}
![]()
With gamma correction
With the gamma correction, we achieve optimal brightness distribution across the NeoPixel Ring circuit.
#include <Adafruit_NeoPixel.h>
#include "hsv.h"

// data pin
#define PIN 6
// led count
#define CNT 24
// max Hue
#define MAXHUE 256*6

Adafruit_NeoPixel strip = Adafruit_NeoPixel(CNT, PIN, NEO_GRB + NEO_KHZ800);

void setup() {
  strip.begin();
  // hue - red
  // saturation - max
  // value - 0-255
  for (int i = 0; i < CNT; i++)
    strip.setPixelColor(i, getPixelColorHsv(i, 0, 255, strip.gamma8(i*(255/CNT))));
  strip.show();
}

void loop() {
}
![]()
Function getPixelColorHsv
This function is used to convert color between HSV and RGB. Fortunately I did not have to write it because I found it in the Pull request for the NeoPixel library. At the time of writing examples, this function was not included in the library. That's why I've modified this function so I can use it with my examples. The function code is not easy to understand, but the author has done a great deal of work. The function is written in such a way that all calculations are integer numbers. It is necessary to approach it as a black box that does what it is intended for.
uint32_t getPixelColorHsv(
  uint16_t n, uint16_t h, uint8_t s, uint8_t v) {

  uint8_t r, g, b;

  if (!s) {
    // Monochromatic, all components are V
    r = g = b = v;
  } else {
    uint8_t sextant = h >> 8;
    if (sextant > 5)
      sextant = 5;  // Limit hue sextants to defined space

    g = v;    // Top level

    // Perform actual calculations

    /*
       Bottom level:
       --> (v * (255 - s) + error_corr + 1) / 256
    */
    uint16_t ww;        // Intermediate result
    ww = v * (uint8_t)(~s);
    ww += 1;            // Error correction
    ww += ww >> 8;      // Error correction
    b = ww >> 8;

    uint8_t h_fraction = h & 0xff;  // Position within sextant
    uint32_t d;      // Intermediate result

    if (!(sextant & 1)) {
      // r = ...slope_up...
      // --> r = (v * ((255 << 8) - s * (256 - h)) + error_corr1 + error_corr2) / 65536
      d = v * (uint32_t)(0xff00 - (uint16_t)(s * (256 - h_fraction)));
      d += d >> 8;  // Error correction
      d += v;       // Error correction
      r = d >> 16;
    } else {
      // r = ...slope_down...
      // --> r = (v * ((255 << 8) - s * h) + error_corr1 + error_corr2) / 65536
      d = v * (uint32_t)(0xff00 - (uint16_t)(s * h_fraction));
      d += d >> 8;  // Error correction
      d += v;       // Error correction
      r = d >> 16;
    }

    // Swap RGB values according to sextant. This is done in reverse order with
    // respect to the original because the swaps are done after the
    // assignments.
    if (!(sextant & 6)) {
      if (!(sextant & 1)) {
        uint8_t tmp = r;
        r = g;
        g = tmp;
      }
    } else {
      if (sextant & 1) {
        uint8_t tmp = r;
        r = g;
        g = tmp;
      }
    }
    if (sextant & 4) {
      uint8_t tmp = g;
      g = b;
      b = tmp;
    }
    if (sextant & 2) {
      uint8_t tmp = r;
      r = b;
      b = tmp;
    }
  }
  return ((uint32_t)r << 16) | ((uint32_t)g << 8) | b;
}
Source code
The source code is located on the GitHub server.
16.04.2018