ESP8266 - HTTP server and AngularJS
Zápisník experimentátora
Hierarchy: ESP8266
Many of the examples for the ESP8266 use the HTML browser only to display static pages generated by the microcontroller. But this way the Internet worked ten years ago. Today, every browser has a high-performance core that can make static pages dynamic by using javascript. You must be aware that you have a high performance in your browser that is unmatched by the performance of ESP8266 itself.
So today we'll show you how to take advantage of this power and generate the resulting page from the microcontroller in the user's browser. ESP8266 will only supply the underlying data and the result will be displayed using AngularJS in the browser. So that today's source code is not too complicated for you, I wrote two sample examples that simulate everything using the SPIFFS file system.
- A one-page application using AngularJS and Bootstrap, which retrieves a list of guitar effects along with images from the ESP8266 and displays the result in a nice table.
- Multi-page application using AngularJS and Bootstrap, which simulates an online thermometer with a table of historical data.
Back to the past
In this article we will use some of the technologies that I described in the previous articles.
Used parts
This is a simple project, so we will need some board with microcontroller ESP8266, which can be directly connected to USB. To avoid a short circuit, you can plug the board into the breadboard.
- ESP8266 {linkESP8266}
- Breadboard {linkBreadBoard}
One-page application using AngularJS
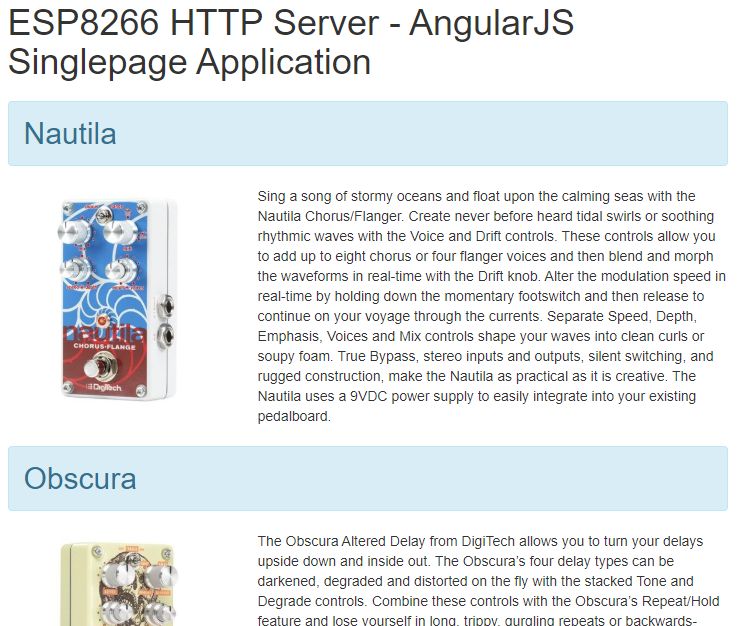
For the first example, I chose some guitar effects from Digitech. They have interesting names (Nautila, Polara, Obscura) and they also have mysterious pictures on their surface. You can see what the resulting HTML page looks like in the following image. The page consists of the following files.
- index.html - This is the page template for AngularJS. It is a normal HTML page that contains a link to the AngularJS application that creates a resulting page from the template. The template uses a few special tags that the AngularJS application uses to create the resulting page.
- single.js - Source code for AngularJS application. The whole principle of the program is that after initialization, it connects via HTTP to ESP8266 and downloads guitar effect data from there. It inserts the data between its local variables and automatically generates the page itself. This conceals the ease of use of AngularJS.
- data.json - This data is downloaded by the AngularJS application and used to create a table on the page describing each guitar effect and adding images to it.
- simple_http_server_angularjs1.ino - Source code of sketch for ESP8266. We've already shown this type of program here. It is an HTTP server that delivers all content from the SPIFFS file system.
- images - We also have images stored in the SPIFFS file system. When the AngularJS application creates a page, it also adds image links to it, and they are automatically downloaded from SPIFFS.
index.html
Let's explain how to create an AngularJS application using this template. At first this is loaded into the browser and these HTML tags are required to run the AngularJS application. There are several <script> tags at the top of the page. They ensure that we download the responsive design of Bootstrap and AngularJS. The last <script src = "single.js"> </script> tag loads the program's source code into your browser. <div ng-app = "singleApp" ng-controller = "singleCtrl"> ... </div> is used to let the program know where to create the resulting page on the page. This is how we marked the singleApp app with the singleCtrl graphics controller. Other tags contain attributes that serve as commands for AngularJS. For example, the ng-repeat attributes to create a cycle and the {{xxx}} tag are used to display the contents of a variable in the program.
<html>

<head>
    <meta http-equiv="content-type" content="text/html;charset=UTF-8">
    <meta name="viewport" content="width=device-width, initial-scale=1">
    <link rel="stylesheet" href="https://maxcdn.bootstrapcdn.com/bootstrap/3.4.1/css/bootstrap.min.css">
    <script src="https://ajax.googleapis.com/ajax/libs/jquery/3.3.1/jquery.min.js"></script>
    <script src="https://maxcdn.bootstrapcdn.com/bootstrap/3.4.1/js/bootstrap.min.js"></script>
    <script src="https://ajax.googleapis.com/ajax/libs/angularjs/1.7.8/angular.js"></script>
    <script src="single.js"></script>
    <link rel="icon" type="image/png" href="favicon.png">
    <title>HTTP Server ESP8266 - AngularJS single</title>
</head>

<body>
    <div class="container" ng-app="singleApp" ng-controller="singleCtrl">
        <h1>ESP8266 HTTP Server - AngularJS Singlepage Application</h1>
        <div ng-repeat="x in data.pedals | orderBy: 'name'">
            <h2 class="alert alert-info">{{x.name}}</h2>
            <div class="row">
                <div class="col-sm-4"><img class="img-responsive" src="{{x.image}}"></div>
                <div class="col-sm-8">{{x.description}}</div>
            </div>
        </div>

        <p>Copyright (C) 2019 <a href="https://www.arduinoslovakia.eu">Arduino Slovakia</a>.</p>
    </div>
</body>

</html>
single.js
I probably haven't mentioned in the text yet that AngularJS has been designed to make programs in it simple. This is the whole program. A singleApp application is created and assigned to the app variable. And a singleCtrl controller is added to this application. After startup, the controller calls the downloadData() function, which downloads the contents of the data.json file and stores it in the $scope.data variable. And you don't have to worry any more, because in the template we have set that data.pedals is an array to be displayed sequentially and the form is determined by nested HTML tags in the div tag, which acts as a loop.
var app = angular.module('singleApp', []);

app.controller('singleCtrl', ['$scope', '$http', function ($scope, $http) {

    function downloadData() {
        $http.get('data.json')
        .then(function (response) {
            $scope.data = response.data;
        }, function (response) {
            $scope.error = response.data.error;
        });
    }

    downloadData();

}]);
data.json
This is the sample JSON. It contains three objects in the pedals array. Each object has three attributes. Name, description and image link.
{
    "pedals": [
        {
            "name": "Nautila",
            "description": "Sing a song of stormy oceans and float upon the calming seas with the Nautila Chorus/Flanger. Create never before heard tidal swirls or soothing rhythmic waves with the Voice and Drift controls. These controls allow you to add up to eight chorus or four flanger voices and then blend and morph the waveforms in real-time with the Drift knob. Alter the modulation speed in real-time by holding down the momentary footswitch and then release to continue on your voyage through the currents. Separate Speed, Depth, Emphasis, Voices and Mix controls shape your waves into clean curls or soupy foam. True Bypass, stereo inputs and outputs, silent switching, and rugged construction, make the Nautila as practical as it is creative. The Nautila uses a 9VDC power supply to easily integrate into your existing pedalboard.",
            "image": "nautila.jpg"
        },
        {
            "name": "Polara",
            "description": "Featuring seven inspirational Lexicon® reverbs, the DigiTech® Polara will be the new architect of your soundscape, defining space and adding dimension to your playing. The Polara’s flexible reverbs cover a full spectrum, from the intimate warmth of “Room”, to the vast expansiveness of “Hall”, through time with the cosmic power of “Reverse”, and anchored by Lexicon’s revered “Modulated”, “Plate” and “Spring” reverbs. In addition to those classics, the Polara introduces the new “Halo” reverb. The “Halo” reverb with cascading octaves interspersed in the reverb decays will cast a heavenly glow over your tone. With its new, compact size and soft-touch vacuum-style footswitch, the Polara truly represents the latest evolution in DigiTech pedal design. We’ve put years of experience into every detail of its mechanical and sonic blueprint. The Polara offers independent Level, Liveliness, Decay and Type controls; Stereo Inputs and Outputs; a Soft Click Footswitch; and a Reverb Tails On/Off Toggle Switch. It is true bypass, and uses a 9V DC power supply to easily integrate into your existing pedalboard.",
            "image": "polara.jpg"
        },
        {
            "name": "Obscura",
            "description": "The Obscura Altered Delay from DigiTech allows you to turn your delays upside down and inside out. The Obscura’s four delay types can be darkened, degraded and distorted on the fly with the stacked Tone and Degrade controls. Combine these controls with the Obscura’s Repeat/Hold feature and lose yourself in long, trippy, gurgling repeats or backwards-manipulated sonic mayhem. In addition to its Tone and Degrade controls, the Obscura features independent Level, Delay Mode and stacked Time and Repeats controls. Complimenting those versatile controls, the Obscura offers four excellent-sounding Analog, Tape, Lo-Fi, and Reverse types, Tap Tempo mode with Beat Divisions, Stereo Inputs/Outputs, a Delay Tails On/Off Switch and True Bypass circuitry. With its compact size and vacuum-style footswitch, the Obscura furthers DigiTech’s evolution in pedal design. We’ve put years of experience into every detail of its mechanical and sonic blueprint. The Obscura uses a 9V DC power supply to easily integrate into your existing pedalboard.",
            "image": "obscura.jpg"
        }
    ]
}
simple_http_server_angularjs1.ino
Source code for ESP8266. It is an HTTP server that delivers all content from SPIFFS. This content is in the data directory and must be loaded into SPIFFS using the Tools/ESP8266 Sketch Data Upload command. SPIFFS is described in detail in a separate article.
#include <ESP8266WiFi.h>
#include <ESP8266WebServer.h>
#include <FS.h>
#include "arduino_secret.h"

ESP8266WebServer server(80);

void setup(void) {
  Serial.begin(115200);
  WiFi.begin(ssid, password);
  Serial.println("");

  // Wait for connection
  while (WiFi.status() != WL_CONNECTED) {
    delay(500);
    Serial.print(".");
  }
  Serial.println("");
  Serial.print("Connected to ");
  Serial.println(ssid);
  Serial.print("IP address: http://");
  Serial.println(WiFi.localIP());

  SPIFFS.begin();

  server.serveStatic("/", SPIFFS, "/index.html");
  server.serveStatic("/favicon.png", SPIFFS, "/favicon.png");
  server.serveStatic("/single.js", SPIFFS, "/single.js");
  server.serveStatic("/data.json", SPIFFS, "/data.json");
  server.serveStatic("/nautila.jpg", SPIFFS, "/nautila.jpg");
  server.serveStatic("/obscura.jpg", SPIFFS, "/obscura.jpg");
  server.serveStatic("/polara.jpg", SPIFFS, "/polara.jpg");

  server.onNotFound([]() {
    server.send(404, "text/plain", "404: Not Found");
  });

  server.begin();
  Serial.println("HTTP server started");
}

void loop(void) {
  server.handleClient();
}
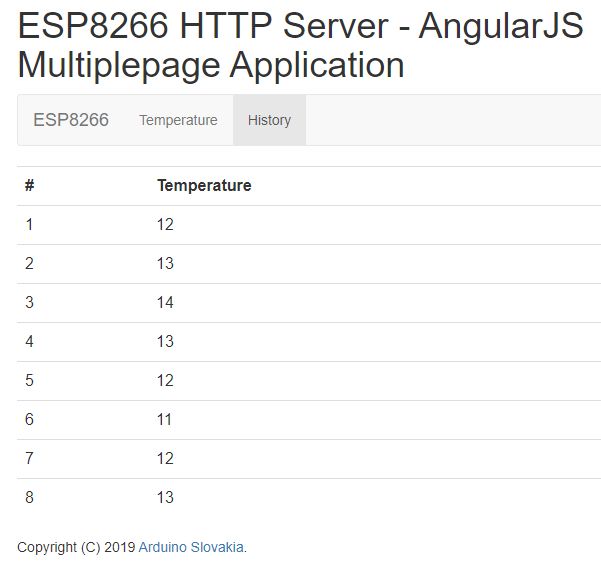
Multi-page application using AngularJS
The second example is more complex. This example is useful when you want to build a larger app on a single website. If you display information on multiple pages, you must create a routing table between the URLs of the subpages and the individual controllers to see the content on each subpage. I have devised the following situation, which quite often appears as an example for ESP8266. It is an application that measures temperature. It uses two pages:
- Temperature - The current temperature is displayed here.
- History - Here is a table showing the historical temperature measurement data.
Again, I only use static data that is found in the SPIFFS file system to create an example, but it is no problem for a more skilful programmer to add that data. If you don't belong to them, wait for some of the ESP8266 sequels to see my example.
The page consists of the following files:
- index.html - Application template. It is slightly different from the previous one because the controller is not set directly on it. These are set in a special table.
- page1.html - Template for the page where the current temperature is displayed.
- page2.html - A template for a page that displays a table of historical temperature measurements.
- multiple.js - AngularJS application source code. Creates a page with two subpages. For each subpage it has its own controller, which takes care of displaying data.
- data1.json - It contains sample data of current temperature.
- data2.json - It contains sample data from the table of historical temperature measurements.
- simple_http_server_angularjs2.ino - Source code for ESP8266. We've already shown this type of program here. It is an HTTP server that delivers all content from the SPIFFS file system.
index.html
Let's explain how to create an AngularJS application using this template. At first this is loaded into the browser and these HTML tags are required to run the AngularJS application. There are several <script> tags at the top of the page. They ensure that we download the responsive design of Bootstrap and AngularJS. The last <script src = "multiple.js"> </script> tag loads the program's source code into your browser. The <div ng-app = "multiple" ng-view> </div> tag is used to let the program know where to create the resulting page on the page. This is how we marked the site for multipleApp with multiple pages. There is a change in the ng-view attribute over the previous template. This will set, that somewhere in the application's source code will be the route table with a template and controller for each URL.
<html>

<head>
    <meta http-equiv="content-type" content="text/html;charset=UTF-8">
    <meta name="viewport" content="width=device-width, initial-scale=1">
    <link rel="stylesheet" href="https://maxcdn.bootstrapcdn.com/bootstrap/3.4.1/css/bootstrap.min.css">
    <script src="https://ajax.googleapis.com/ajax/libs/jquery/3.3.1/jquery.min.js"></script>
    <script src="https://maxcdn.bootstrapcdn.com/bootstrap/3.4.1/js/bootstrap.min.js"></script>
    <script src="https://ajax.googleapis.com/ajax/libs/angularjs/1.7.8/angular.js"></script>
    <script src="https://ajax.googleapis.com/ajax/libs/angularjs/1.7.8/angular-route.js"></script>
    <script src="multiple.js"></script>
    <link rel="icon" type="image/png" href="favicon.png">
    <title>HTTP Server ESP8266 - AngularJS multiple</title>
</head>

<body>
    <div class="container">
        <h1>ESP8266 HTTP Server - AngularJS Multiplepage Application</h1>
        <div ng-app="multipleApp" ng-view>
        </div>

        <p>Copyright (C) 2019 <a href="https://www.arduinoslovakia.eu">Arduino Slovakia</a>.</p>
    </div>
</body>

</html>
page1.html
Template for current temperature. The temperature is displayed using {{data.temperature}}.
<nav class="navbar navbar-default">
    <div class="container-fluid">
        <div class="navbar-header">
            <a class="navbar-brand" href="/">ESP8266</a>
        </div>
        <ul class="nav navbar-nav">
            <li class="active"><a href="/#!/">Temperature</a></li>
            <li><a href="/#!/history">History</a></li>
        </ul>
    </div>
</nav>

<p>Temperature: <b>{{data.temperature}}</b></p>
page2.html
Template for historical temperature measurements. This is a table that displays data from the data.history variable. Because there is only an array of numbers in that variable, I had to add the track by $index parameter. If it was an object table, this is not necessary.
<nav class="navbar navbar-default">
    <div class="container-fluid">
        <div class="navbar-header">
            <a class="navbar-brand" href="/">ESP8266</a>
        </div>
        <ul class="nav navbar-nav">
            <li><a href="/#!/">Temperature</a></li>
            <li class="active"><a href="/#!/history">History</a></li>
        </ul>
    </div>
</nav>

<table class="table">
    <tr>
        <th>#</th>
        <th>Temperature</th>
    </tr>
    <tr ng-repeat="x in data.history track by $index">
        <td>{{$index+1}}</td>
        <td>{{x}}</td>
    </tr>
</table>
multiple.js
This source code is only slightly different. Use the config function to add a routing table between URL, template and controller. And the controllers behave the same as in the previous example. Download JSON and set it to a variable. AngularJS takes care of the rest and creates the resulting pages in the browser.
var app = angular.module('multipleApp', ['ngRoute']);

app.config(function ($routeProvider, $locationProvider) {
    $routeProvider.when('/', {
        controller: 'mainCtrl',
        templateUrl: '/page1.html',
    });

    $routeProvider.when('/history', {
        controller: 'historyCtrl',
        templateUrl: '/page2.html',
    });

    $routeProvider.otherwise({
        redirectTo: '/'
    });
});

app.controller('mainCtrl', ['$scope', '$http', function ($scope, $http) {

    function downloadData() {
        $http.get('data1.json')
        .then(function (response) {
            $scope.data = response.data;
        }, function (response) {
            $scope.error = response.data.error;
        });
    }

    downloadData();

}]);

app.controller('historyCtrl', ['$scope', '$http', function ($scope, $http) {

    function downloadData() {
        $http.get('data2.json')
        .then(function (response) {
            $scope.data = response.data;
        }, function (response) {
            $scope.error = response.data.error;
        });
    }

    downloadData();

}]);
data1.json
A single number with the current value.
{
    "temperature": 12.5
}
data2.json
An array of numbers that represent the measured temperature.
{
    "history": [12, 13, 14, 13, 12, 11, 12, 13]
}
simple_http_server_angularjs2.ino
Source code for ESP8266. It is an HTTP server that delivers all content from SPIFFS. This content is in the data directory and must be loaded into SPIFFS using the Tools/ESP8266 Sketch Data Upload command. SPIFFS is described in detail in a separate article.
#include <ESP8266WiFi.h>
#include <ESP8266WebServer.h>
#include <FS.h>
#include "arduino_secret.h"

ESP8266WebServer server(80);

void setup(void) {
  Serial.begin(115200);
  WiFi.begin(ssid, password);
  Serial.println("");

  // Wait for connection
  while (WiFi.status() != WL_CONNECTED) {
    delay(500);
    Serial.print(".");
  }
  Serial.println("");
  Serial.print("Connected to ");
  Serial.println(ssid);
  Serial.print("IP address: http://");
  Serial.println(WiFi.localIP());

  SPIFFS.begin();

  server.serveStatic("/", SPIFFS, "/index.html");
  server.serveStatic("/favicon.png", SPIFFS, "/favicon.png");
  server.serveStatic("/multiple.js", SPIFFS, "/multiple.js");
  server.serveStatic("/data1.json", SPIFFS, "/data1.json");
  server.serveStatic("/data2.json", SPIFFS, "/data2.json");
  server.serveStatic("/page1.html", SPIFFS, "/page1.html");
  server.serveStatic("/page2.html", SPIFFS, "/page2.html");

  server.onNotFound([]() {
    server.send(404, "text/plain", "404: Not Found");
  });

  server.begin();
  Serial.println("HTTP server started");
}

void loop(void) {
  server.handleClient();
}
Source code
Zdrojový kód se nachází na serveru GitHub.
01.12.2019