ATtiny85 - Blink
Zápisník experimentátora
Hierarchy: ATtiny85
Our baby was born two years ago and his most favourite words are the car and blink. Let's make this blink with the ATtiny85 microcontroller. The Blink program is the most basic program for Arduino, where you will learn the basics of microcontroller pins. In this article we will take over these basics and add some extras to them.
Blink - classic
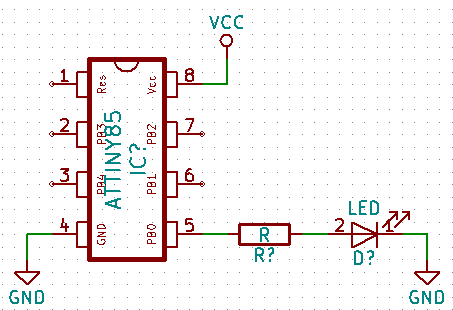
A simple example of basic-blink.ino that flashes with the LED every second on pin 0. Pin 0 is set as an output. It is one second in logical one state and one second in logical zero state. Since we have an LED and the resistor connected to the output, we will see the logic one as the LED on and the logic zero as the LED off.
This will be because the logic one sets the voltage to close to the supply voltage Vcc. The current will flow from the pin to the resistor and through the LED to the GND. In the case of logic zero, the pin voltage will be close to GND, so no current will flow through the LED. The value of the resistor is set so that you do not exceed the maximum current on the pin. You can find the exact value in the datasheet under Absolute Maximum Ratings. For ATtiny85, the maximum is 40 mA. We do not need so much current to light the LED so we use the 1k resistor and the blue LED. You do not have to worry about why I just used these values. Remember that it is enough for this type of experiment and that it is far below the allowed limit.
Although this example is nothing new, but the development of some circuits, such simple involvement will make life easier. If we look at the compiled program, we find that it has only a few lines, but it takes 898 bytes (IDE 1.8.5). It is clear that there is also hidden program start and some settings that are hidden from us due to Arduino, but this still seems to be quite a bit compared to the total of about 8000 bytes we have at our disposal. Is it possible to do something about it? For a possible solution, see the next chapter.
const int led = 0;
const int sleep = 1000;

// the setup routine runs once when you press reset:
void setup() {
  // initialize the digital pin as an output.
  pinMode(led, OUTPUT);
}

// the loop routine runs over and over again forever
void loop() {
  digitalWrite(led, HIGH); // turn the LED on (HIGH is the voltage level)
  delay(sleep);            // wait for a second
  digitalWrite(led, LOW);  // turn the LED off by making the voltage LOW
  delay(sleep);            // wait for a second
}
Blink - economically
In the previous chapter, we flashed with the LED and used 10% of the available memory. Now we will use the basic-blink-pin.ino program. After compiling it, it will has 468 bytes. The difference is 430 bytes.
const int led = 0;
const int sleep = 1000;

// the setup routine runs once when you press reset:
void setup() {
  // initialize the digital pin as an output.
  bitSet(DDRB, led);
}

// the loop routine runs over and over again forever
void loop() {
  bitSet(PINB, led);
  delay(sleep);
}
Differences:
- I replaced the function pinMode with direct port handling.
- I have replaced multiple calls of digitalWrite with direct port handling. In addition, I used the microcontroller to write a bit on the PINx port to get the negation HIGH or LOW, which also saved some space.
- I could even optimize the call of the function delay, but it would not have a significant effect.
By way of example, I wanted to show that, when necessary, we have room for shortening the code. Of course, use a healthy saddle and wisdom and use it only when it makes sense. It is important to realize that:
- Your code does not see anyone in the microcontroller, so there is no one to admire it. But they see the result of his work, and if there's a mistake there, somebody's talking about your head.
- The clarity and comprehensibility of the second listing is significantly lower.
- How much can it take for me to switch over to low-level operations and how many mistakes I can make there?
- In the microcontroller your code is not shared with other code. All the space is just for you. So take it. And when the microcontroller is integrated in the circuit, it stays there forever, or until your work is down to the user, or until an electrical problem sends it to eternal rest.
Programming
To program the microcontroller, you need to have:
- Installed the core ATTinyCore - https://github.com/SpenceKonde/ATTinyCore
You are programming using the Arduino or via USBasp.
- Arduino as an ISP programmer
- Programming the ATtiny84 with the Arduino as ISP
- USBasp as a programmer
Circuitry can be plugged into a breadboard or you can lay it on your own development board, which saves you a lot of work when you re-create the circuit.
Resistor calculation for LED
The formula for calculating the resistor is R = (Usrc - ULED) / I.
Source code
The source code is located on the GitHub server.
Update 02/2021
After a few years, I checked if the code still works for IDE 1.8.12. Both programs work reliably. Only the size of the compiled code in the first example has changed. The code now has only 880 bytes. The size of the second code remained unchanged. From the fact that the size of the compiled code has decreased a bit, we can conclude that the compiler has been improved, or that the Arduino core is better designed with the need for a little less memory.
Video
06.02.2021