Node-RED: Arduino and DS18B20
Zápisník experimentátora
Hierarchy: Node.js
Node-RED can work with serial port. In this article, we will connect the Arduino and the DS18B20 temperature sensor to the serial port. Arduino will send the measurement results through the serial port, and Node-RED will parse them to make it easier to process. The Node-RED flow will be adapted to process data from multiple DS18B20 temperature sensors.
Used parts
You will need these parts.
- Arduino {linkArduino}
- Breadboard {linkBreadboard}
- DS18B20 {linkDS18B20}
Arduino
Using Arduino, we read the current temperature from the DS18B20 sensor. An example of a possible breadboard connection is shown in the following figure. There's Arduino Pro Mini and two DS18B20 sensors connected in parasitic mode. If the parasitic mode doesn't work because you bought the sensors from Chinese vendors, plug it in normally.
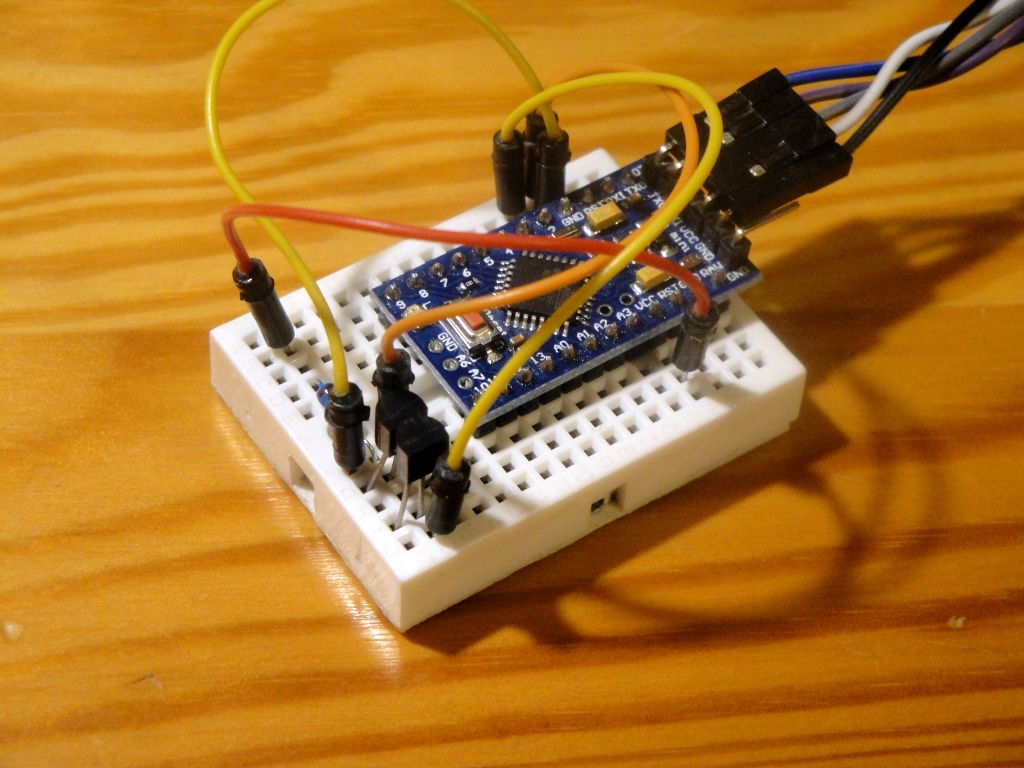
The wiring diagram is shown in the following figure. The parasitic power mode only differs in the Vdd pin connection. In parasitic power mode, Vdd is connected to GND.

The source code of the program is simple. One line is printed for each sensor. A unique sensor address and the current temperature are listed in the row. We print a unique address on the serial port to have a unique sensor identifier available. Subsequently, we can assign a name to this Node-RED identifier and transform the results into a more human-friendly form. At the same time, we have acquired a universal program that can handle any number of sensors.
#include <OneWire.h>
#include <DallasTemperature.h>

// Data wire is plugged into port 2 on the Arduino
#define ONE_WIRE_BUS 2

// Setup a oneWire instance to communicate with any OneWire devices (not just Maxim/Dallas temperature ICs)
OneWire oneWire(ONE_WIRE_BUS);

// Pass our oneWire reference to Dallas Temperature.
DallasTemperature sensors(&oneWire);

/*
   The setup function. We only start the sensors here
*/
void setup(void)
{
  // start serial port
  Serial.begin(9600);

  // Start up the library
  sensors.begin();
  sensors.setResolution(12);
}

/*
   Main function, get and show the temperature
*/
void loop(void)
{
  int numberOfDevices = sensors.getDeviceCount();
  if (numberOfDevices > 0) {
    sensors.requestTemperatures();
    for (int i = 0; i < numberOfDevices; i++) {
      DeviceAddress tempDeviceAddress;
      sensors.getAddress(tempDeviceAddress, i);
      for (uint8_t i = 0; i < 8; i++) {
        if (tempDeviceAddress[i] < 16) Serial.print("0");
        Serial.print(tempDeviceAddress[i], HEX);
      }
      Serial.print(";");
      float t = sensors.getTempCByIndex(0);
      Serial.println(t);
    }
  }

  delay(2000);
}
The output from the program to the serial port looks like this. I used two sensors in the example. Two new result lines are listed every two seconds. If we connect Node-RED to the serial port instead of a Serial monitor, we will be able to further process the results from the Arduino.

Node-RED
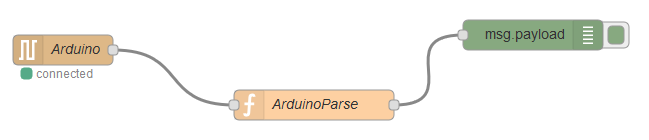
To use a serial port in Node-RED, you must have additional nodes installed from the node-red-node-serialport package. For installation, see Node-RED: Installation. We will create a simple flow that will have three nodes.
- input/serial - This node reads the individual lines sent by Arduino. The node is connected to the serial port.
- function/function - This node performs input data transformation. It converts a line of text that sent Arduino to an object that has two parameters.
- output/debug - This node is used to print debug data on the debug console.
Node-RED serial port - input
The node that is connected to the serial port must be configured. The figure shows the node that is connected to COM6 at 9600 baud. This speed must be the same as set in the Arduino program.
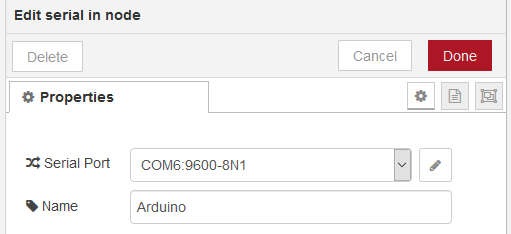
Serial port settings have many parameters. It is necessary to set the parameter Split input on the character \n. This ensures reading of the sent text from Arduino by lines.

Data conversion
We will use the following function to convert data. It is closed in a try-catch block because we need to handle the fact that another Arduino that does not contain our program will connect to the serial port. At that time, any output can be sent to the serial port, which does not match our assumption. In that case, there is an exception that does not compromise the running of our program.
try {
let p = msg.payload;
p = p.replace('\r\n', '');
p = p.split(';');
msg.payload = {
    id: p[0],
    value: parseFloat(p[1])
};
} catch(e) {
    node.error(e);
}
return msg;
Debug console
This is how the resulting output looks to the console. You see that after data conversion we have an object with two parameters available. We only use the Debug Console for demonstration purposes. In a real example, you could now send data to a database, or send it to an HTTP or MQTT server.
- id - DS18B20 sensor identification number.
- value - Current temperature.

Source code
The source code is located on GitHub.
23.05.2019