Node-RED: ESP8266 and DS18B20
Zápisník experimentátora
Hierarchy: Node.js
In today's article we will link two amazing technologies. Node-RED and its flows will serve as a server and ESP8266 will be used as an HTTP client to send the measured temperature to the server. In this article we will use the knowledge of the two previous articles. Arduino will be replaced by ESP8266 and the measured temperature will not be transmitted via serial port, but via HTTP protocol. In Node-RED, we will use an HTTP server to which ESP8266 will send the measured temperature. Let's go.
Back to the past
These articles provide information that may be useful to you. In the articles I described Node-RED, ESP8266 and temperature measurement using DS18B20 sensor.
- Node-RED: Installation
- Node-RED: First flow
- Node-RED: Arduino and DS18B20
- Node-RED: Debug HTTP endpoint
- ESP8266 - HTTP server and temperature sensor DS18B20
- ESP8266 - File system SPIFFS
Parts list
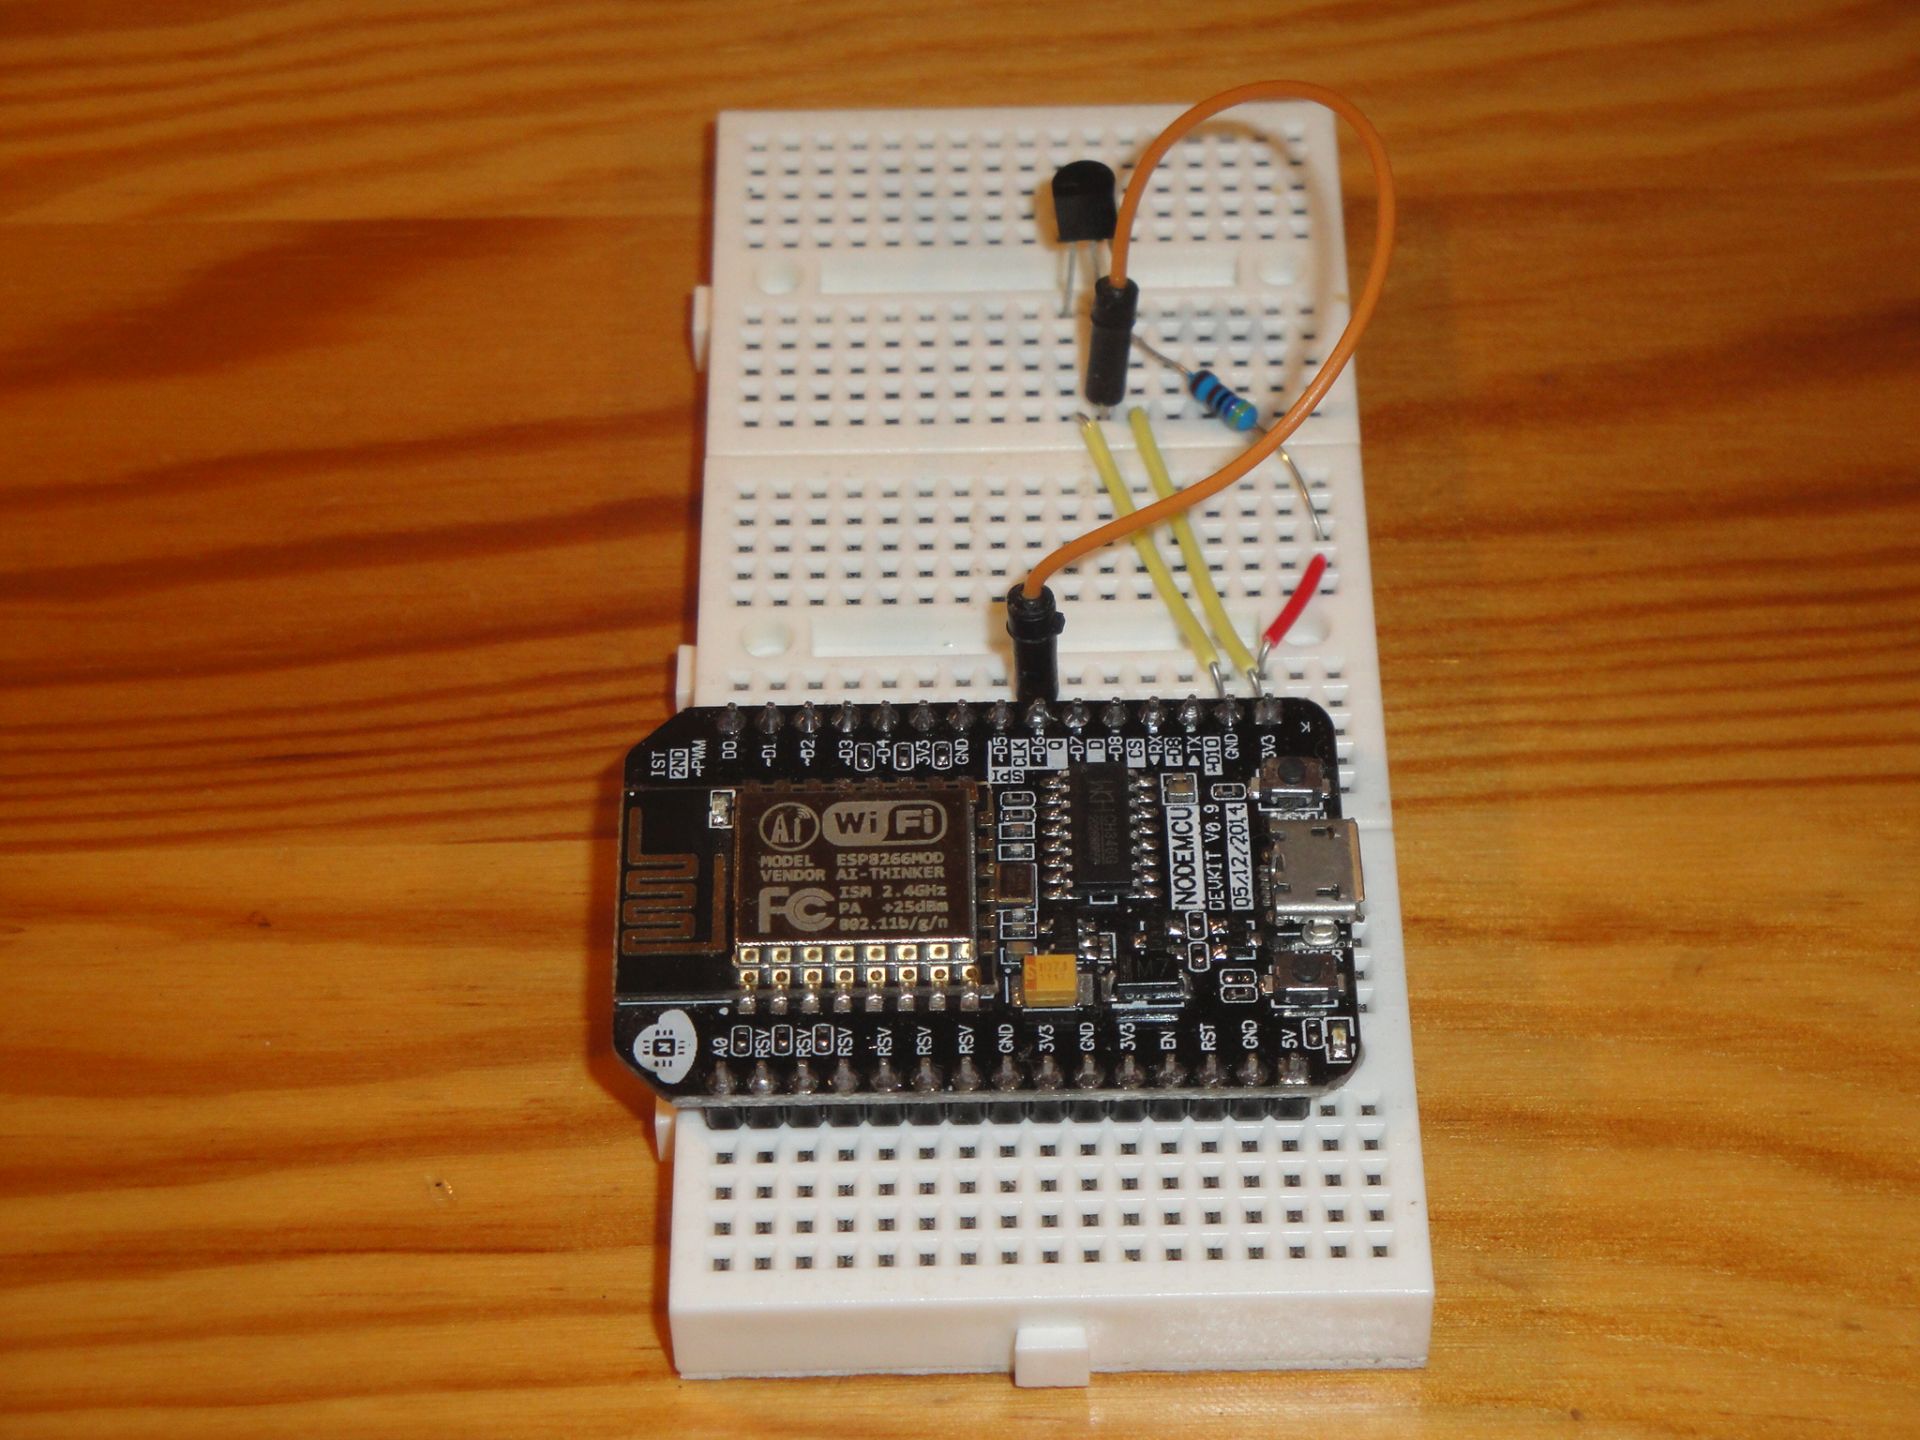
We will need the following parts:
- ESP8266 {linkESP8266}
- Breadboard {linkBreadboard}
- DS18B20 {linkDS18B20}
- Resistor 4k7 {linkR}
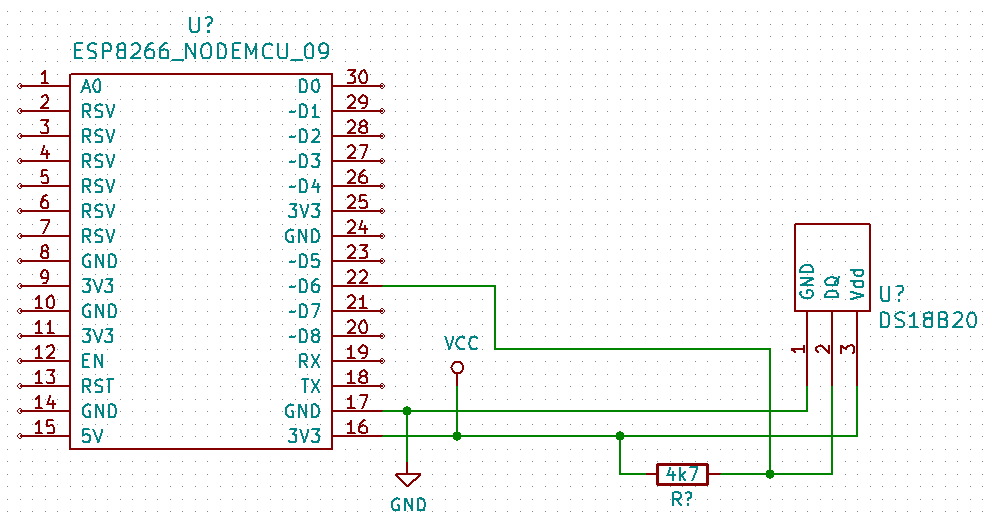
The components are wired according to this diagram. A pull-up resistor must be connected to pin D6. The temperature sensor is normally connected to GND and 3.3V. If you have original temperature sensors, you can also connect it to a parasitic power supply. You can use any number of sensors. Both ESP8266 and Node-RED are ready to do so.
Node-RED
Node-RED is a flow-oriented environment in which you create data flows between nodes. Such an environment is suitable for processing temperature data. Temperature is measured at one or more locations and must be processed somewhere. Node-RED provides the ideal environment for this because you can easily determine where the data is coming from and where to send it. You do all this in a graphical environment, where you add nodes to your desktop that you connect using link lines. Lines represent the actual flow of data from one node to another.
Node-RED can be found on the Internet at https://nodered.org/. There is a description on how to install the development environment on the page, but some details do not emphasize enough. The important thing is that you must have administrator privileges. You can get them on Linux by using the sudo command and on Windows by running the console in administrator mode. For installation details, see the article describing the installation process.
In the article on debugging an HTTP endpoint, I described how to debug an entry point in a flow called HTTP ESP8266 Request. I have described the format of the input data and what is done with the data. The basic idea is that the ESP8266 measures temperature using any number of DS18B20 sensors. Each single measurement can therefore have 0-N values. Therefore, the input data has the format of an array of objects with two parameters.
[
    {
        "id": "0011223344556677",
        "value": 25
    },
    {
        "id": "0011223344556688",
        "value": 26
    }
]
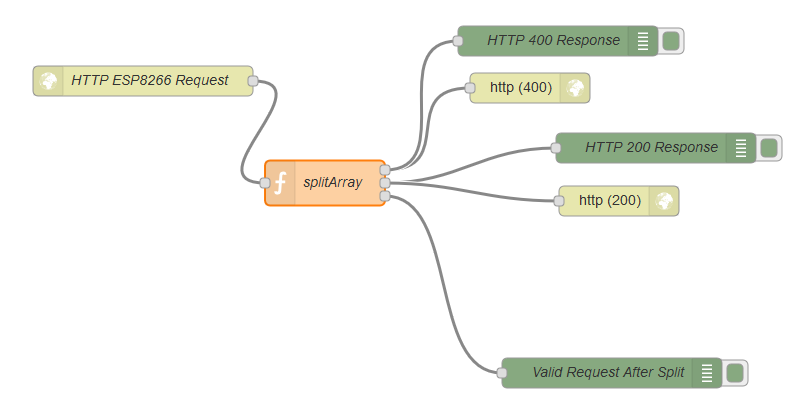
In the article I described how these data are validated and transformed from the array of data to the flow of individual data. This task is made in the node splitArray. It has one entry point and three exit points. The input is an array of measured temperatures and the output can be three different points. The node validates the input and decides whether to accept or reject the measured temperatures accordingly.
- http (400) - If the input data does not match, a response 400 is returned from the HTTP server.
- http (200) - If the input data is OK, a response of 200 from the HTTP server is returned. The number of processed measurements is sent in the reply. You can check this response in the HTTP client and take some additional steps.
- Valid request - In this example, this node is just a listing on the debug console. Here, all the measured temperatures come in succession and the flow can process them in some way. For example, save them to a database, or send them to another server for processing.
splitArray
This is how the source code of the splitArray node looks in javascript. The individual commands used are adapted to the flow provided by Node-RED. This means that some variable names are fixed. For example, this is the variable msg that Node-RED uses as the input variable to your function. The first command verifies that the msg.payload is an array. If it is not, the first error response is sent. Since the answer can be directed to one of the three outputs, we must write it as an array of responses. In this case, the response is sent to the first output, so the message format is in the form of [msg, null, null].
Then we can check the individual elements of the array. We do this by verifying the existence of the required parameters and by using a regular expression to verify that the content of the id parameter is 16 characters long and represents the ID of the DS18B20 temperature sensor. If everything is OK, we create a new message and route it to output # 3.
At the moment, the response to ESP8266, which is still waiting for it, has not yet been sent. This is sent after all the array elements have been processed, and in response, the number of processed records is sent using output 2. At that time, ESP8266 has the option to process the response from the server.
if(Array.isArray(msg.payload)===false) {
    msg.payload = { error: 'Bad request'};
    return [msg, null, null];
}

const regex = /[0-9A-Fa-f]{16}/g;

for(let element in msg.payload) {
    let e = msg.payload[element];

    if(e.id===undefined || e.value===undefined) {
        msg.payload = { error: 'Bad element parameters'};
        return [msg, null, null];
    }
    if(!e.id.match(regex)) {
        msg.payload = { error: 'Bad element id'};
        return [msg, null, null];
    }
    node.send([null, null, {"payload": e}]);
}

msg.payload = { ok: 'Handled: '+msg.payload.length};
return [null, msg, null];
ESP8266
Now the program source code for ESP8266 follows. To make this program not just a simple variation to measure temperature, I have programmed several demonstrations of different techniques that may be useful to you.
- Use a structure to save a configuration. The structure is declared as
RedConfigtype and contains the interval how often the temperature should be measured and the URL of the server to which the temperature is sent. The actual variable that contains the configuration is calledcfg. The default values are easily filled using a constructor, which is only a method in a structure with the same name. - Save the configuration in the SPIFFS file system. A configuration that is hard-coded in the source code has its drawbacks. For example, you may not like the set measurement interval and the HTTP server in Node-RED will certainly have a different IP address. Therefore, it is convenient to have this configuration stored so that it can be easily modified. In this program I used to save the configuration in the SPIFFS file system. Another option is WiFiManager. Function
loadConfigtakes care of loading the configuration. - Using the ArduinoJson library to parse a configuration that is stored in SPIFFS. The function
loadConfigalso contains the source code, which uses this library to parse the configuration in the JSON file. The author of the library did a good job and parsing with the library is ridiculously simple. When converting some values to String, you need to help the compiler a bit and cast the parameter value toconst char *. The library can handle itself other conversions. The source code is for version 6. In older versions of the library, the source code looks slightly different. - Using the ArduinoJson library to create a JSON document with a measured temperature. The library also provides convenient functions for creating JSON documents. For an example, see the function
sendData. Again, only a few lines of source code are required. Even though we are creating an array of objects. We create one object for each sensor. Note that we use the functionsprintfto create the parameterid. You will rarely see such a character string creation in the Arduino world. In most cases, programmers resort to crazy constructions instead of making proper use of the functions that are designed to do so. - Handling possible HTTP client errors. Error handling should not be missing in any program. This is because many error conditions can occur. For example, the target server will not work, or it will not like anything about your data and will refuse to work with it. You should keep this in mind, and in the source code you will find some examples of how to deal with errors.
#include <ESP8266WiFi.h>
#include <ESP8266HTTPClient.h>
#include <FS.h>
#include "arduino_secret.h"
#include <OneWire.h>
#include <DallasTemperature.h>
#include <ArduinoJson.h>

#define ONE_WIRE_BUS D6

OneWire oneWire(ONE_WIRE_BUS);
DallasTemperature sensors(&oneWire);

struct RedConfig {
  long timeout;
  unsigned long previous;
  String server;

  RedConfig()
  : timeout(30000),
    previous(0),
    server("http://192.168.0.150:1880/sendtemperature")
    {}
};

RedConfig cfg;

void loadConfig() {
  File f = SPIFFS.open("/config.json", "r");
  if (!f) {
    Serial.println("File '/config.json' open failed.");
    return;
  }

  StaticJsonDocument<256> doc;
  deserializeJson(doc, f);
  cfg.server = (const char*)doc["server"];
  cfg.timeout = doc["timeout"];
  f.close();
  Serial.printf("New config server: %s\n", cfg.server.c_str());
  Serial.printf("New config timeout: %d\n", cfg.timeout);
}

void sendData() {
  if (WiFi.status() == WL_CONNECTED) {
    int numberOfDevices = sensors.getDeviceCount();
    if (numberOfDevices > 0) {
      sensors.requestTemperatures();
      StaticJsonDocument<1024> array;

      for (int i = 0; i < numberOfDevices; i++) {
        DeviceAddress tda;
        sensors.getAddress(tda, i);
        char id[17];
        sprintf(id, "%02X%02X%02X%02X%02X%02X%02X%02X",
                tda[0], tda[1], tda[2], tda[3],
                tda[4], tda[5], tda[6], tda[7]);
        float t = sensors.getTempCByIndex(0);

        JsonObject nested = array.createNestedObject();
        nested["id"] = id;
        nested["value"] = t;
      }
      serializeJson(array, Serial);
      Serial.println("");

      HTTPClient http;
      bool connected = http.begin(cfg.server);
      if (connected) {
        http.addHeader("Content-Type", "application/json");
        String output;
        serializeJson(array, output);
        int httpCode = http.POST(output);
        Serial.print("http.POST=");
        Serial.print(httpCode);
        if (httpCode < 0) {
          Serial.print(" ");
          Serial.print(http.errorToString(httpCode));
        }
        Serial.println("");
        if (httpCode == HTTP_CODE_OK || httpCode == HTTP_CODE_BAD_REQUEST) {
          String payload = http.getString();
          Serial.println(payload);
        }
      }
      else
        Serial.println("http.begin error");
    }
  }
}

void setup() {
  pinMode(LED_BUILTIN, OUTPUT);
  Serial.begin(115200);
  WiFi.begin(ssid, password);
  Serial.println("");

  // Wait for connection
  while (WiFi.status() != WL_CONNECTED) {
    delay(500);
    Serial.print(".");
  }
  Serial.println("");
  Serial.print("Connected to ");
  Serial.println(ssid);
  Serial.print("IP address: ");
  Serial.println(WiFi.localIP());

  sensors.begin();
  SPIFFS.begin();
  loadConfig();
}

void loop() {
  unsigned long current = millis();
  if (current - cfg.previous >= cfg.timeout) {
    cfg.previous = current;
    digitalWrite(LED_BUILTIN, LOW);
    sendData();
    digitalWrite(LED_BUILTIN, HIGH);
  }
}
config.json
The file config.json must be uploaded to SPIFFS using the menu command Tools/ESP8266 Sketch Data Upload.
{
"server": "http://192.168.0.150:1880/sendtemperature",
"timeout": 20000
}
Source code
The source code is located on the GitHub server.
08.09.2019