MKR1000 - Scanning WiFi Network
Zápisník experimentátora
Hierarchy: Arduino MKR1000
In this article, we try to scan your WiFi network using the Arduino MKR1000. Based on a sample example that is included with the WiFi101 library, we will modify the program so that the result is displayed on the Nokia 5110 display.
Scanning a WiFi network is a grateful project for every visitor. You build the scanner and you can take it to the settlement and see what networks are there. Or just sit at the table and watch what's near you. For example, I see from my desk 5-7 networks. Two of them are at home and the surrounding are somewhere in nearby dwellings.
Nokia 5110
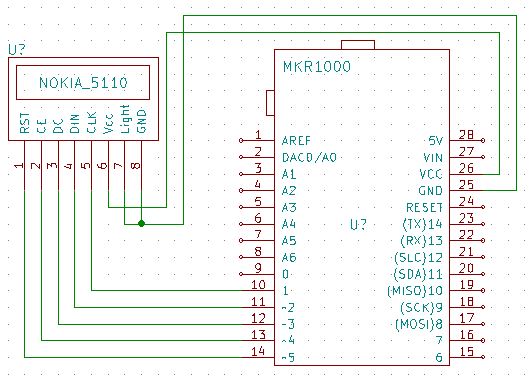
I like to use this display in my projects. The classic 5-volt Arduino needs a level shifter to control it. All of this can be dropped in the MKR1000 because it uses the same as the 3.3V display. So the whole wiring is shrinking into several wires.
We will use the Adafruit_PCD8544 library to control the display. It can also be installed in the library manager, but it has one hook. A minimum version of 1.0.1 is required to work with SAMD21 microcontrollers. At the time of writing article, it was already updated library at GitHub, but was not yet available in the library manager. Therefore, it was necessary to manually download it from GitHub and overwrite the installed library.
WiFi101
Another necessary library is WiFi101. This can also be installed in the library manager. At the time of writing the article there was version 0.11.0.
IDE
I tested project in IDE 1.6.12.
Behavior of program (sketch)
I've modified the program according to the original sample example to the WiFi101 ScanNetworks library. He listed the WiFi network found on the serial port. That's all I've left in the code, even though some features have been slightly modified. I added listings on the Nokia 5110 display.
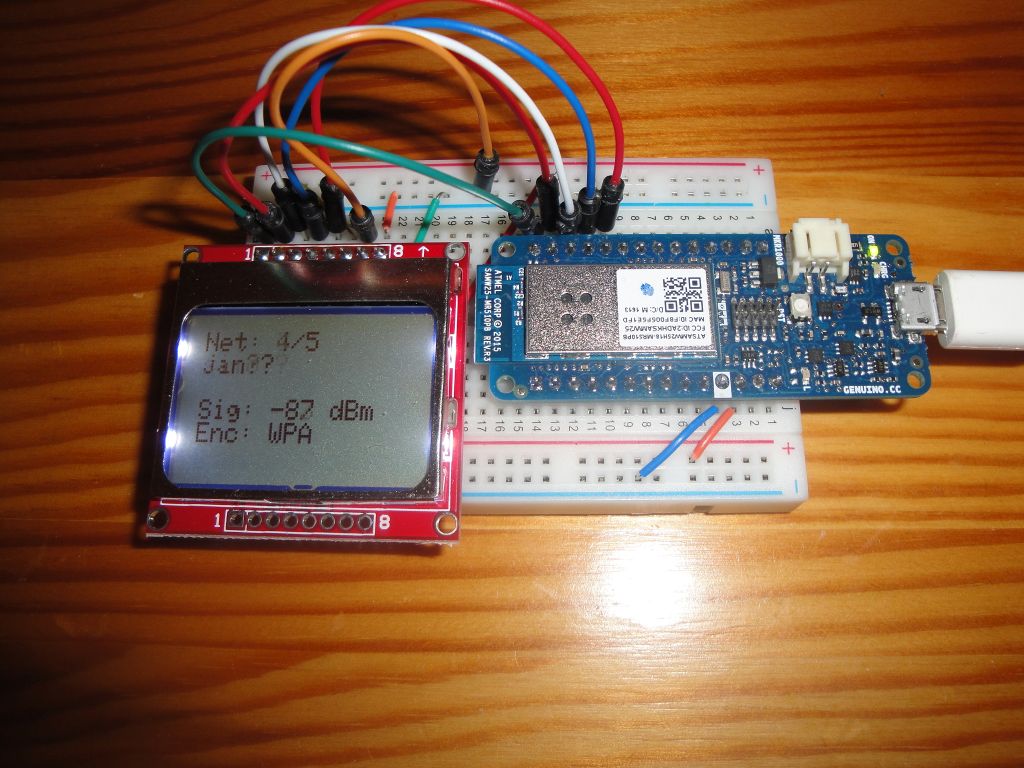
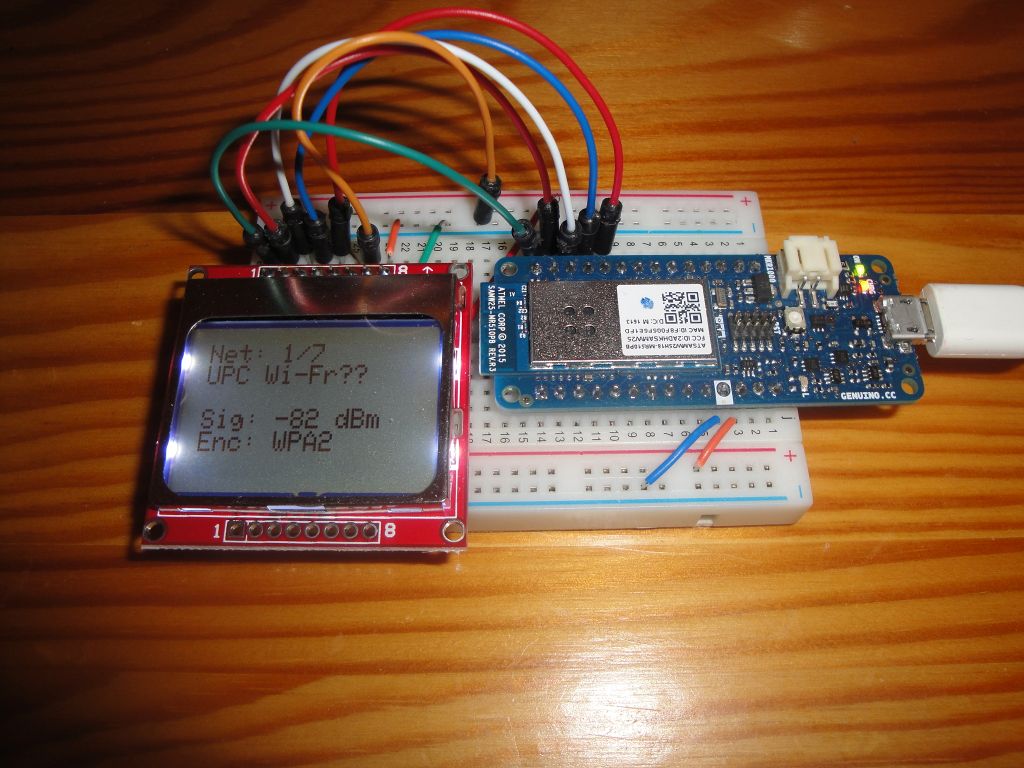
It works by scanning the list of WiFi networks, which is displayed on the display. The example is well visible in the accompanying drawings. List:
- Network serial number
- SSID Network - This is the network name. To keep some privacy on the network, the two last characters are always replaced by a question mark. In the source text, you can turn it off if necessary and see the entire network name.
- Signal strength
- Cryptography
The listing changes every two seconds. Once all networks are listed, they will look again for the current list of WiFi networks and continue with their listing.
Including libraries and display settings.
#include <Adafruit_GFX.h>
#include <Adafruit_PCD8544.h>
#include <WiFi101.h>

// Software SPI (slower updates, more flexible pin options):
// pin 1 - Serial clock out (SCLK)
// pin 2 - Serial data out (DIN)
// pin 3 - Data/Command select (D/C)
// pin 4 - LCD chip select (CS)
// pin 5 - LCD reset (RST)
Adafruit_PCD8544 nokia = Adafruit_PCD8544(1, 2, 3, 4, 5);
Setting. You may need to adjust the contrast. Values above 60 will cause a large display noise, below 50 you will probably see nothing. The setup also contains intro in function drawIntro. This consists of displaying two information screens. The MAC address of the microcontroller will also be displayed for a while.
void setup()   {
  Serial.begin(9600);

  nokia.begin();
  nokia.setContrast(60);
  nokia.clearDisplay();   // clears the screen and buffer
  drawIntro();
  nokia.clearDisplay();
  nokia.display();

  // check for the presence of the shield:
  if (WiFi.status() == WL_NO_SHIELD) {
    Serial.println("WiFi shield not present");
    nokia.setCursor(0, 0);
    nokia.print("WiFi shield not present");
    nokia.display();
    // don't continue:
    while (true);
  }

  // Print WiFi MAC address:
  printMacAddress();
}
This is the code of intro.
void drawIntro()
{
  nokia.setCursor(0, 0);
  nokia.print("WiFi Scan Network");
  Serial.println("WiFi Scan Network");
  nokia.setCursor(0, 20);
  nokia.print("www.arduinoslovakia.eu");
  nokia.display();
  delay(2000);
  nokia.clearDisplay();
  nokia.setCursor(0, 0);
  nokia.print("List of all WiFi networks.");
  Serial.println("List of all WiFi networks.");
  nokia.display();
  delay(2000);
}
View MAC address. In the original code, they were typed by individual bytes. But the print function does not format well hexadecimal numbers, less than 0F, and displays them as F. But we have enough memory in the MKR1000 microcontroller to allow us to be comfortable with the sprintf function. And it looks even nicer.
void printMacAddress() {
  // the MAC address of your Wifi shield
  byte mac[6];
  char draw[30];

  // print your MAC address:
  WiFi.macAddress(mac);
  sprintf(draw, "MAC:%02X:%02X:%02X:%02X:%02X:%02X", mac[5], mac[4], mac[3], mac[2], mac[1], mac[0]);

  nokia.clearDisplay();
  nokia.setCursor(0, 0);
  nokia.print(draw);
  Serial.println(draw);

  nokia.display();
}
The main program cycle. Periodically, the listNetworks function is called, which takes care of rendering.
void loop() {
  // scan for existing networks:
  Serial.println("Scanning available networks...");
  nokia.clearDisplay();
  nokia.setCursor(0, 0);
  nokia.print("Scanning...");
  nokia.display();
  listNetworks();
}
Dedicated to serial port (original code) and Nokia 5110 display (new code). It uses the draw and ssid variables to draw text. Note how strlen is used to mask the last two SSIDs. All listings are again prepared using sprintf.
void listNetworks() {
  char draw[30];
  char ssid[M2M_MAX_SSID_LEN];

  // scan for nearby networks:
  int numSsid = WiFi.scanNetworks();
  if (numSsid == -1)
  {
    Serial.println("Couldn't get a wifi connection");
    while (true);
  }

  // print the list of networks seen:
  Serial.print("Number of available networks: ");
  Serial.println(numSsid);

  // print the network number and name for each network found:
  for (int thisNet = 0; thisNet < numSsid; thisNet++) {
    strcpy(ssid,WiFi.SSID(thisNet));
    int dl=strlen(ssid);
    if(dl>2) { // hide some details
      ssid[dl-2]='?';
      ssid[dl-1]='?';
    }

    Serial.print(thisNet+1);
    Serial.print(") ");
    Serial.print(ssid);
    Serial.print("\tSignal: ");
    Serial.print(WiFi.RSSI(thisNet));
    Serial.print(" dBm");
    Serial.print("\tEncryption: ");
    Serial.println(getEncryptionType(WiFi.encryptionType(thisNet)));
    Serial.flush();

    nokia.clearDisplay();
    nokia.setCursor(0, 0);
    sprintf(draw,"Net: %d/%d",thisNet+1,numSsid);
    nokia.print(draw);
    nokia.setCursor(0, 8);
    nokia.print(ssid);
    nokia.setCursor(0, 24);
    sprintf(draw,"Sig: %d dBm",WiFi.RSSI(thisNet));
    nokia.print(draw);
    nokia.setCursor(0, 32);
    sprintf(draw,"Enc: %s",getEncryptionType(WiFi.encryptionType(thisNet)));
    nokia.print(draw);
    nokia.display();

    delay(2000);
  }
}
I have completely overwritten the following function. The original code was directly written to the serial port. Now the function only returns the pointer to the text string.
const char S_WEP[]="WEP";
const char S_TKIP[]="WPA";
const char S_CCMP[]="WPA2";
const char S_NONE[]="None";
const char S_AUTO[]="Auto";
const char S_UNKNOWN[]="Unkn.";

const char* getEncryptionType(int thisType) {
  // read the encryption type and print out the name:
  switch (thisType) {
    case ENC_TYPE_WEP:
      return S_WEP;
    case ENC_TYPE_TKIP:
      return S_TKIP;
    case ENC_TYPE_CCMP:
      return S_CCMP;
    case ENC_TYPE_NONE:
      return S_NONE;
    case ENC_TYPE_AUTO:
      return S_AUTO;
    default:
      return S_UNKNOWN;
  }
}
Source code
The source code is located on GitHub.
Video
The video about the article is on YouTube. The video shows a WiFi network scan around me and a WiFi point connection from my cell phone and Xiaomi Yi action camera.
04.07.2017