State machine for Arduino
Zápisník experimentátora
When you create a project using the Arduino and use buttons and LEDs, you usually create some type of state machine. The state machine responds to the buttons and outputs signals outward via the output pins. You may not even realize that you are creating the state machine that has to adhere to a lot of rules. Typically, you have a limited number of buttons and one button performs various tasks. The state machine makes it easy to define the states and definition of actions that are associated with these states. And with these exact rules, your program will respond as you need it. Let's learn how to make state machine comfortably.
arduino-fsm
We will use the ready-made solution to create state machines. You install the arduino-fsm library using a library manager. In three examples, we will show its possibilities. In the demos, I used the examples that are part of the library. However, this library also suffers from bad documentation, and examples contain mistakes. I have corrected these bugs and added one more example to better illustrate the possibilities of the library.
Blink
The first example mimics the typical Blink program, with which begins every Arduino user. The program is longer than the original Blink, as it demonstrates callback capabilities at any point in time. In this case, most of the features do nothing; they merely list the serial port information. This is a good introduction to understanding the state machine.
Each state (state_light_on and state_light_off) is defined by three callback functions.
- The first is called when the state is activated. The function can be understood as a state initialization. In this case, the callback function is used to switch the HIGH/LOW on the pin on which the LED is connected.
- The second function is called constantly while staying in the state. In this case, it has no use and is the NULL pointer instead. For practical use, see example 2, where the button press is checked.
- The last function is called when leaving the state and going to a new state. You can use the function when you leave the state and need something to do right now. For a practical use, see example 3.
In order to switch between states, it is necessary to define the permitted paths between states. This is done using the function add_transition. Its parameters are
- initial state
- end state
- event
- callback
If the path between states is defined in the system and the event is signaled, the state machine switches to a new state. Switching is accompanied by calling all callback functions in the correct order. This order can be found in the source code of the function make_transition. The event is send to the state machine using the function trigger.
#include "Fsm.h"

// Used pins
#define LED_PIN LED_BUILTIN

// State machine variables
#define FLIP_LIGHT_SWITCH 1

State state_light_on(on_light_on_enter, NULL, &on_light_on_exit);
State state_light_off(on_light_off_enter, NULL, &on_light_off_exit);
Fsm fsm(&state_light_off);

// Transition callback functions
void on_light_on_enter() {
  Serial.println(__FUNCTION__);
  digitalWrite(LED_PIN, HIGH);
}

void on_light_on_exit() {
  Serial.println(__FUNCTION__);
  digitalWrite(LED_PIN, LOW);
}

void on_light_off_enter() {
  Serial.println(__FUNCTION__);
}

void on_light_off_exit() {
  Serial.println(__FUNCTION__);
}

void on_trans_light_on_light_off() {
  Serial.println(__FUNCTION__);
  Serial.println("  Transitioning from LIGHT_ON to LIGHT_OFF");
}

void on_trans_light_off_light_on() {
  Serial.println(__FUNCTION__);
  Serial.println("  Transitioning from LIGHT_OFF to LIGHT_ON");
}

// standard arduino functions
void setup() {
  Serial.begin(9600);
  Serial.println("FSM Light Switch");
  pinMode(LED_PIN, OUTPUT);

  fsm.add_transition(&state_light_on, &state_light_off,
                     FLIP_LIGHT_SWITCH,
                     &on_trans_light_on_light_off);
  fsm.add_transition(&state_light_off, &state_light_on,
                     FLIP_LIGHT_SWITCH,
                     &on_trans_light_off_light_on);
  fsm.run_machine();
}

void loop() {
  Serial.println("-- loop --");
  delay(2000);
  fsm.trigger(FLIP_LIGHT_SWITCH);
}
Timed transition
The second example uses a state machine to switch the status using a button. The first press switches state_led_on. The second press switches state_led_off. You can also press the button to handle the button debounce in the function check_button. Pushbuttons often generate spurious open/close transitions when pressed, due to mechanical and physical issues: these transitions may be read as multiple presses in a very short time fooling the program.
The demo contains another interesting transition between the states. This is a timed transition, which is called automatically when state_led_on is turned on and 5 seconds elapsed. This will be done by the function add_timed_transition. This is a very good aid in the world of microcontrollers, where such timing has a lot of use. You do not have to complicate programming, just add a timed transition. Note that the loop function calls only one function run_machine. This function calls the function check_button, which takes care of triggering the event at the moment the button push is detected.
#include "Fsm.h"

// Used pins
#define LED_PIN     LED_BUILTIN
#define BUTTON_PIN  10

// Events
#define BUTTON_EVENT  0

// Button states and debounce
int buttonState = 0;
int lastButtonState = HIGH;
unsigned long lastDebounceTime = 0;

// States
State state_led_off(&led_off, &check_button, NULL);
State state_led_on(&led_on, &check_button, NULL);
Fsm fsm(&state_led_off);

void led_off() {
  Serial.println(__FUNCTION__);
  digitalWrite(LED_PIN, LOW);
}

void led_on() {
  Serial.println(__FUNCTION__);
  digitalWrite(LED_PIN, HIGH);
}

// Check button and debounce
void check_button() {
  int reading = digitalRead(BUTTON_PIN);
  if (reading != lastButtonState)
    lastDebounceTime = millis();

  if ((millis() - lastDebounceTime) > 50) {
    if (reading != buttonState) {
      buttonState = reading;
      if (buttonState == LOW) {
        Serial.println("button_pressed");
        fsm.trigger(BUTTON_EVENT);
      }
    }
  }

  lastButtonState = reading;
}

void setup() {
  Serial.begin(9600);

  pinMode(LED_PIN, OUTPUT);
  pinMode(BUTTON_PIN, INPUT_PULLUP);

  fsm.add_transition(&state_led_off, &state_led_on,
                     BUTTON_EVENT, NULL);
  fsm.add_timed_transition(&state_led_on, &state_led_off, 5000, NULL);
  fsm.add_transition(&state_led_on, &state_led_off, BUTTON_EVENT, NULL);
}

void loop() {
  fsm.run_machine();
}
Timed transition with LED module
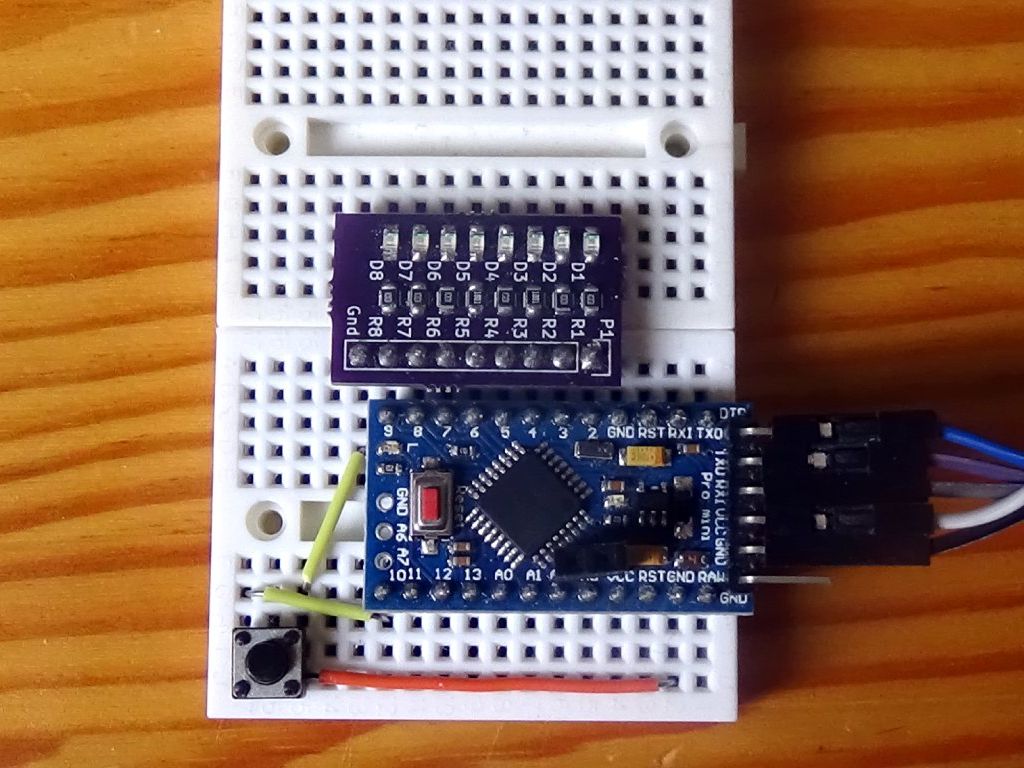
In the last example, I decided to test the library's options on a larger state machine. From the previous example, I left the power on and off and added other states. These are used to control eight LEDs. I have them connected as shown in the picture. I use a module with 8 LEDs along with resistors. This is one of my own module and I use it on a breadboard.
8 LEDs make up a fancy strip of LED lights that turn on gradually. Press the buttons repeatedly to turn on all the LEDs. If you continue to press the button, the LEDs will turn off and the entire cycle will be repeated. Note how I used the function led_leave in the last state. Here I was given the opportunity to perform the action when I left the state and reset the LED counter.
To make the example more complicated, I also added timed transitions. The length of the LED strip remaining in the lighted state is directly proportional to the number of LEDs on. If I do not press the button again at the specified time, the whole state machine switches to the initial state.
#include "Fsm.h"

// Used pins
#define LED_PIN     LED_BUILTIN
#define BUTTON_PIN  10

const int LED_BAR[] = {2, 3, 4, 5, 6, 7, 8, 9};
const int LED_BAR_LENGTH = sizeof(LED_BAR) / sizeof(int);
int bar_position = 0;

// Events
#define BUTTON_EVENT  0

// Button states and debounce
int buttonState = 0;
int lastButtonState = HIGH;
unsigned long lastDebounceTime = 0;

// States
State state_led_off(&led_off, &check_button, NULL);
State state_led_on(&led_on,   &check_button, NULL);
State state_led1(&led_enter,  &check_button, NULL);
State state_led2(&led_enter,  &check_button, NULL);
State state_led3(&led_enter,  &check_button, NULL);
State state_led4(&led_enter,  &check_button, NULL);
State state_led5(&led_enter,  &check_button, NULL);
State state_led6(&led_enter,  &check_button, NULL);
State state_led7(&led_enter,  &check_button, NULL);
State state_led8(&led_enter,  &check_button, &led_leave);
Fsm fsm(&state_led_off);

void led_off() {
  Serial.println(__FUNCTION__);
  digitalWrite(LED_PIN, LOW);
  for (int i = 0; i < LED_BAR_LENGTH; i++)
    digitalWrite(LED_BAR[i], LOW);
  bar_position = 0;
}

void led_on() {
  Serial.println(__FUNCTION__);
  digitalWrite(LED_PIN, HIGH);
}

void led_enter() {
  Serial.println(__FUNCTION__);
  if (bar_position < LED_BAR_LENGTH)
    bar_position++;
  for (int i = 0; i < bar_position; i++)
    digitalWrite(LED_BAR[i], HIGH);
  for (int i = bar_position; i < LED_BAR_LENGTH; i++)
    digitalWrite(LED_BAR[i], LOW);
}

void led_leave() {
  Serial.println(__FUNCTION__);
  bar_position = 0;
}

// Check button and debounce
void check_button() {
  int reading = digitalRead(BUTTON_PIN);
  if (reading != lastButtonState)
    lastDebounceTime = millis();

  if ((millis() - lastDebounceTime) > 50) {
    if (reading != buttonState) {
      buttonState = reading;
      if (buttonState == LOW) {
        Serial.println("button_pressed");
        fsm.trigger(BUTTON_EVENT);
      }
    }
  }

  lastButtonState = reading;
}

void setup() {
  Serial.begin(9600);

  pinMode(LED_PIN, OUTPUT);
  for (int i = 0; i < LED_BAR_LENGTH; i++)
    pinMode(LED_BAR[i], OUTPUT);
  pinMode(BUTTON_PIN, INPUT_PULLUP);

  // on/off
  fsm.add_transition(      &state_led_off, &state_led_on, BUTTON_EVENT, NULL);
  fsm.add_timed_transition(&state_led_on,  &state_led_off, 5000, NULL);

  // LED bar button
  fsm.add_transition(      &state_led_on,  &state_led1, BUTTON_EVENT, NULL);
  fsm.add_transition(      &state_led1,    &state_led2, BUTTON_EVENT, NULL);
  fsm.add_transition(      &state_led2,    &state_led3, BUTTON_EVENT, NULL);
  fsm.add_transition(      &state_led3,    &state_led4, BUTTON_EVENT, NULL);
  fsm.add_transition(      &state_led4,    &state_led5, BUTTON_EVENT, NULL);
  fsm.add_transition(      &state_led5,    &state_led6, BUTTON_EVENT, NULL);
  fsm.add_transition(      &state_led6,    &state_led7, BUTTON_EVENT, NULL);
  fsm.add_transition(      &state_led7,    &state_led8, BUTTON_EVENT, NULL);
  fsm.add_transition(      &state_led8,    &state_led1, BUTTON_EVENT, NULL);
  // timed transitions
  fsm.add_timed_transition(&state_led1,    &state_led_off, 1000, NULL);
  fsm.add_timed_transition(&state_led2,    &state_led_off, 2000, NULL);
  fsm.add_timed_transition(&state_led3,    &state_led_off, 3000, NULL);
  fsm.add_timed_transition(&state_led4,    &state_led_off, 4000, NULL);
  fsm.add_timed_transition(&state_led5,    &state_led_off, 5000, NULL);
  fsm.add_timed_transition(&state_led6,    &state_led_off, 6000, NULL);
  fsm.add_timed_transition(&state_led7,    &state_led_off, 7000, NULL);
  fsm.add_timed_transition(&state_led8,    &state_led_off, 8000, NULL);
}

void loop() {
  fsm.run_machine();
}
Source code
The source code is located on the GitHub server.
14.02.2018