I2C tester
Zápisník experimentátora
Hierarchy: I2C
I2C tester je užitočná pomôcka pre každého, kto pripája k Arduinu nové I2C zariadenie. Pomocou neho sa ľahko skontroluje, či I2C komunikácia funguje. Väčšina z nás využíva I2C tester zo stránok Arduina. Pred pár dňami som natrafil na podobný tester, ale s prehľadnejšie usporiadaným výstupom. Volá sa i2cdetect a je využívaný na jednodoskových počítačoch typu Raspberry Pi alebo Orange Pi. Toto je adaptácia programu do prostredia Arduina.
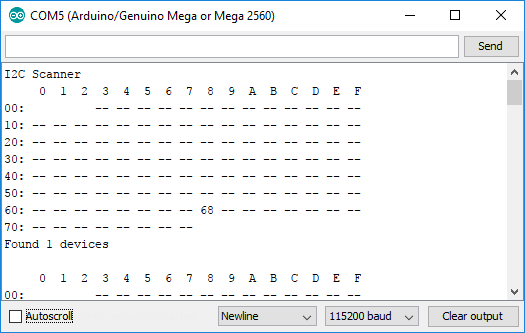
Program som napísal podľa obrázku, ktorý som našiel na Internete. Napodobnil som výstup na sériový port tak, aby sa podobal na pôvodný program.
#include <Wire.h>

void setup() {
  Wire.begin();

  Serial.begin(115200);
  Serial.println("I2C Scanner");
}

void loop() {
  uint8_t error, address, line = 1;
  int nDevices = 0;

  Serial.println("     0  1  2  3  4  5  6  7  8  9  A  B  C  D  E  F");
  Serial.print  ("00:         ");

  // https://learn.adafruit.com/i2c-addresses/the-list
  for (address = 0x03; address < 0x78; address++ ) {
    // The i2c_scanner uses the return value of
    // the Write.endTransmisstion to see if
    // a device did acknowledge to the address.
    Wire.beginTransmission(address);
    error = Wire.endTransmission();

    if (error == 0) {
      printHex(address);
      nDevices++;
    }
    else if (error == 4)
      Serial.print(" ER");
    else
      Serial.print(" --");

    if ((address + 1) % 16 == 0) {
      Serial.println();
      Serial.print(line);
      Serial.print("0:");
      line++;
    }

  }
  if (nDevices == 0)
    Serial.println("\nNo I2C devices found\n");
  else {
    Serial.print("\nFound ");
    Serial.print(nDevices);
    Serial.println(" devices\n");
  }

  delay(5000);           // wait 5 seconds for next scan
}

void printHex(uint8_t address) {
  Serial.print(" ");
  if (address < 16)
    Serial.print("0");
  Serial.print(address, HEX);
}
Zdrojový kód
Zdrojový kód sa nachádza na serveri GitHub.
08.10.2017