Získanie údajov o počasí pomocou ESP8266
Zápisník experimentátora
Hierarchy: ESP8266
V tomto článku si ukážeme, ako sa dajú stiahnuť online údaje o počasi pomocou mikrokontroléra ESP8266. Využijeme na to server openweathermap.org. Programovať budeme v Arduino IDE. Toto je druhý článok v sérii, ktorá zahŕňa Node.js, ESP8266 a Arduino MKR1000. V tomto článku si ukážeme tri príklady. V príkladoch si ukážeme jednoduché stiahnutie odpovede zo servera vo formáte JSON a výpis na sériový port. V poslednom príklade si vytvoríme malú meteorologickú stanicu pomocou OLED displeja.
openweathermap.org
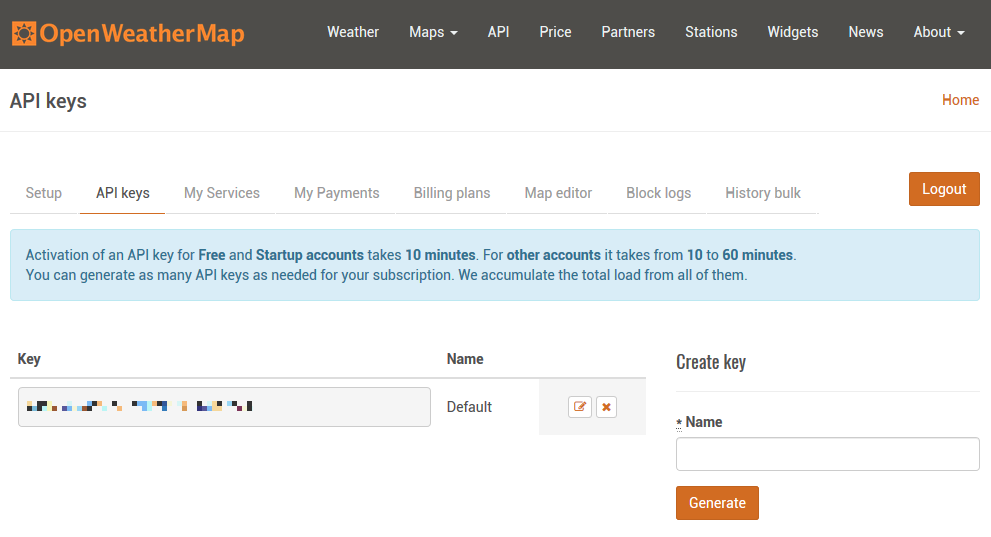
Tento server poskytuje údaje o počasi. Môžete sa na serveri zaregistrovať a potom získate kľúč k API, pomocou ktorého si môžete zo servera stiahnuť údaje o počasi a využiť ich pre vlastné účely. Registrácia je bezplatná, pokiaľ sa uspokojíte so základnými funkciami API. Presný zoznam poskytovaných služieb nájdete na stránke openweathermap.org/price.
Pre našu ukážku budeme využívať funkciu API Current weather data. Jej kompletný popis nájdete na stránke openweathermap.org/current. Budeme používať dve funkcie.
- By city name - Funkciu zavoláte s parametrom vášho mesta a získate údaje o počasi.
- By city ID - Funkciu zavoláte s identifikátorom vášho mesta a získate údaje o počasi. Identifikátor získate na stránke tak, že si dáte vyhľadať vaše mesto a pozriete si parameter v URL. Napríklad.
- Banská Bystrica - openweathermap.org/city/3061186
- Zvolen - openweathermap.org/city/3056459
Server vráti údaje o počasi vo formáte JSON. Pomocou parametrov môžete nastaviť niektoré údaje. Môžete meniť napríklad zobrazenie teploty v stupňoch Kelvina, Celzia alebo vo Fahrenheitoch. Vrátené údaje vyzerajú takto.
{ coord: { lon: 19.15, lat: 48.74 },
  weather:
   [ { id: 801,
       main: 'Clouds',
       description: 'few clouds',
       icon: '02n' } ],
  base: 'stations',
  main:
   { temp: 19.43,
     pressure: 1011,
     humidity: 64,
     temp_min: 19,
     temp_max: 20 },
  visibility: 10000,
  wind: { speed: 0.5 },
  clouds: { all: 20 },
  dt: 1525030200,
  sys:
   { type: 1,
     id: 5909,
     message: 0.004,
     country: 'SK',
     sunrise: 1524972341,
     sunset: 1525024594 },
  id: 3061186,
  name: 'Banska Bystrica',
  cod: 200 }
Použité diely
V článku sú použité nasledovné diely:
- NodeMCU 0.9 (link) - Ale radšej si kupujte verziu 1.0.
- 7pin 0.96 in SPI OLED 128x64 White (link) - Podstatné je, aby bol displej označený ako SPI. Tieto sú výrazne rýchlejšie než I2C verzie. Predávajú sa v troch farebných modifikáciách. Bielej, modrej a dvojfarebnej. Displej znesie napätie 5 V.
- Breadboard (link) - Používam dva miniatúrne, pretože NodeMCU 0,9 sa na normálny breadboard nezmestí. Dva miniatúrne ale majú svoju výhodu pri zapájaní, čo je pekne vidno na fotografii.
Prepojenie medzi pinmi je nasledovné.
| NodeMCU | OLED |
|---|---|
| D1 | D0 |
| D2 | D1 |
| D3 | RES |
| D4 | DC |
| D5 | CS |
| GND | GND |
| 3V3 | VCC |
Použité knižnice
Použil som:
- Jadro pre ESP8266 vo verzii 2.4.1 a 2.3.0. Staršie jadro som musel použiť v treťom príklade, kde sa využíva OLED displej.
- Arduino JSON - https://github.com/bblanchon/ArduinoJson
- U8g2 - https://github.com/olikraus/u8g2
Programy
Napísal som tri vzorové príklady. Chcel som pomocou nich ukázať, ako postupne vyvíjame program od jednoduchej funkcie až po komplexnejší príklad, ktorý rieši viac funkcií naraz.
Výpis na sériový port
Prvý príklad vypisuje získané údaje zo servera na sériový port. Najprv si definujeme niekoľko konštánt pre API. Ďalšie konštanty sa nachádzajú v súbore arduino_secret.h, ktorý tu nie je uvedený. Nájdete ho na GitHub a obsahuje definície pripojenia k WiFi. Výsledkom je premenná param, ktorá obsahuje celú URL, ktorú budeme na server odosielať protokolom HTTPS a metódou GET.
Na pripojenie k serveru používame triedu WiFiClientSecure. Trieda obsahuje aj možnosť verifikácie HTTPS certifikátu, ale tieto funkcie som nepoužil. Nie je to potrebné, pretože v tomto príklade sa nehráme na tajných agentov s paranoiou. Uspokojíme sa s tým, že máme šifrované spojenie a veríme tomu, že na druhej strane s nami komunikuje správny server.
Za zaslaním požiadavky vidíte kód, ktorý najprv skontroluje správnosť hlavičky v odpovedi, nájde koniec hlavičky pomocou príkazu client.find("\r\n\r\n") a pomocou triedy DynamicJsonBuffer si stiahne telo odpovede zo servera. Odpoveď je sformátovaná a funkciou prettyPrintTo odoslaná na sériový port.
#include <ESP8266WiFi.h>
#include <WiFiClientSecure.h>
#include <ArduinoJson.h>
#include "arduino_secret.h"

const char* host = "api.openweathermap.org";
const int httpsPort = 443;
const char* url = "/data/2.5/weather";
const char* openweathermapid = "3061186"; // Banska Bystrica
const char* openweathermapq = "Banska%20Bystrica"; // Banska Bystrica
const char* openweathermapunits = "metric"; // Celsius

//String param = String(url) +
//               "?id=" + openweathermapid +
//               "&units=" + openweathermapunits +
//               "&APPID=" + APPID;

String param = String(url) +
               "?q=" + openweathermapq +
               "&units=" + openweathermapunits +
               "&APPID=" + APPID;

String line;

void setup() {
  Serial.begin(115200);
  Serial.println();
  Serial.print("connecting to ");
  Serial.println(ssid);
  WiFi.mode(WIFI_STA);
  WiFi.begin(ssid, password);
  while (WiFi.status() != WL_CONNECTED) {
    delay(500);
    Serial.print(".");
  }
  Serial.println("");
  Serial.println("WiFi connected");
  Serial.println("IP address: ");
  Serial.println(WiFi.localIP());

  // Use WiFiClientSecure class to create TLS connection
  WiFiClientSecure client;
  Serial.print("connecting to ");
  Serial.println(host);
  if (!client.connect(host, httpsPort)) {
    Serial.println("connection failed");
    return;
  }

  Serial.print("requesting URL: ");
  Serial.println(url);

  client.print(String("GET ") + param + " HTTP/1.1\r\n" +
               "Host: " + host + "\r\n" +
               "User-Agent: ESP8266\r\n" +
               "Connection: close\r\n\r\n");

  Serial.println("request sent");

  line = client.readStringUntil('\n');
  if (line != "HTTP/1.1 200 OK\r") {
    Serial.print("Unexpected response: ");
    Serial.println(line);
    return;
  }

  if (client.find("\r\n\r\n")) {
    DynamicJsonBuffer jsonBuffer(4096);
    JsonObject& root = jsonBuffer.parseObject(client);
    root.prettyPrintTo(Serial);
  }
}

void loop() {
}
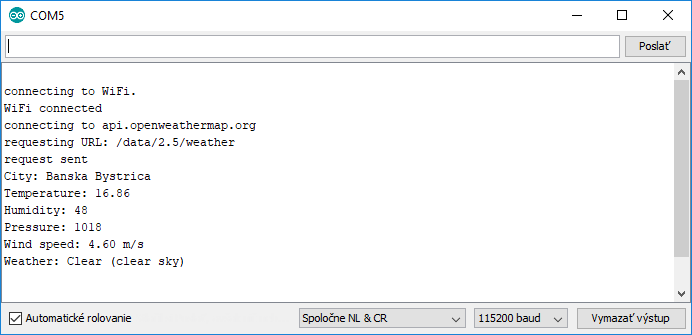
Parsovanie JSON
Začiatok druhého programu je identický s prvým programom. Líši sa iba koniec, kde sú parsované údaje o počasí. Všetky funkcie vyzerajú veľmi podobne. Napŕiklad teplotu získame príkazom const double temp = root["main"]["temp"];. Niektoré údaje sú vo forme reálneho čísla a preto sa ich výpis na sériový port môže líšiť. Verzia jadra 2.3.0 musí používať funkciu dtostrf. Verzia jadra 2.4.1 môže použiť funkciu printf.
#include <ESP8266WiFi.h>
#include <WiFiClientSecure.h>
#include <ArduinoJson.h>
#include "arduino_secret.h"

const char* host = "api.openweathermap.org";
const int httpsPort = 443;
const char* url = "/data/2.5/weather";
const char* openweathermapid = "3061186"; // Banska Bystrica
const char* openweathermapq = "Banska%20Bystrica"; // Banska Bystrica
const char* openweathermapunits = "metric"; // Celsius

//String param = String(url) +
//               "?id=" + openweathermapid +
//               "&units=" + openweathermapunits +
//               "&APPID=" + APPID;

String param = String(url) +
               "?q=" + openweathermapq +
               "&units=" + openweathermapunits +
               "&APPID=" + APPID;

String line;

void setup() {
  Serial.begin(115200);
  Serial.println();
  Serial.print("connecting to WiFi");
  //Serial.println(ssid);
  WiFi.mode(WIFI_STA);
  WiFi.begin(ssid, password);
  while (WiFi.status() != WL_CONNECTED) {
    delay(500);
    Serial.print(".");
  }
  Serial.println("");
  Serial.println("WiFi connected");
  //Serial.println("IP address: ");
  //Serial.println(WiFi.localIP());

  // Use WiFiClientSecure class to create TLS connection
  WiFiClientSecure client;
  Serial.print("connecting to ");
  Serial.println(host);
  if (!client.connect(host, httpsPort)) {
    Serial.println("connection failed");
    return;
  }

  Serial.print("requesting URL: ");
  Serial.println(url);

  client.print(String("GET ") + param + " HTTP/1.1\r\n" +
               "Host: " + host + "\r\n" +
               "User-Agent: ESP8266\r\n" +
               "Connection: close\r\n\r\n");

  Serial.println("request sent");

  line = client.readStringUntil('\n');
  if (line != "HTTP/1.1 200 OK\r") {
    Serial.print("Unexpected response: ");
    Serial.println(line);
    return;
  }

  if (client.find("\r\n\r\n")) {
    DynamicJsonBuffer jsonBuffer(4096);
    JsonObject& root = jsonBuffer.parseObject(client);
    //root.prettyPrintTo(Serial);

    // parsed output
    const char* name = root["name"];
    Serial.print("City: ");Serial.println(name);

    const double temp = root["main"]["temp"];
    char buffer[64];
    sprintf(buffer, "Temperature: %.02f", temp);
    Serial.println(buffer);

    const int humidity = root["main"]["humidity"];
    sprintf(buffer, "Humidity: %d", humidity);
    Serial.println(buffer);

    const int pressure = root["main"]["pressure"];
    sprintf(buffer, "Pressure: %d", pressure);
    Serial.println(buffer);

    const double wind = root["wind"]["speed"];
    sprintf(buffer, "Wind speed: %.02f m/s", wind);
    Serial.println(buffer);

    const char* weather = root["weather"][0]["main"];
    const char* description = root["weather"][0]["description"];
    sprintf(buffer, "Weather: %s (%s)", weather, description);
    Serial.println(buffer);
  }
}

void loop() {
}
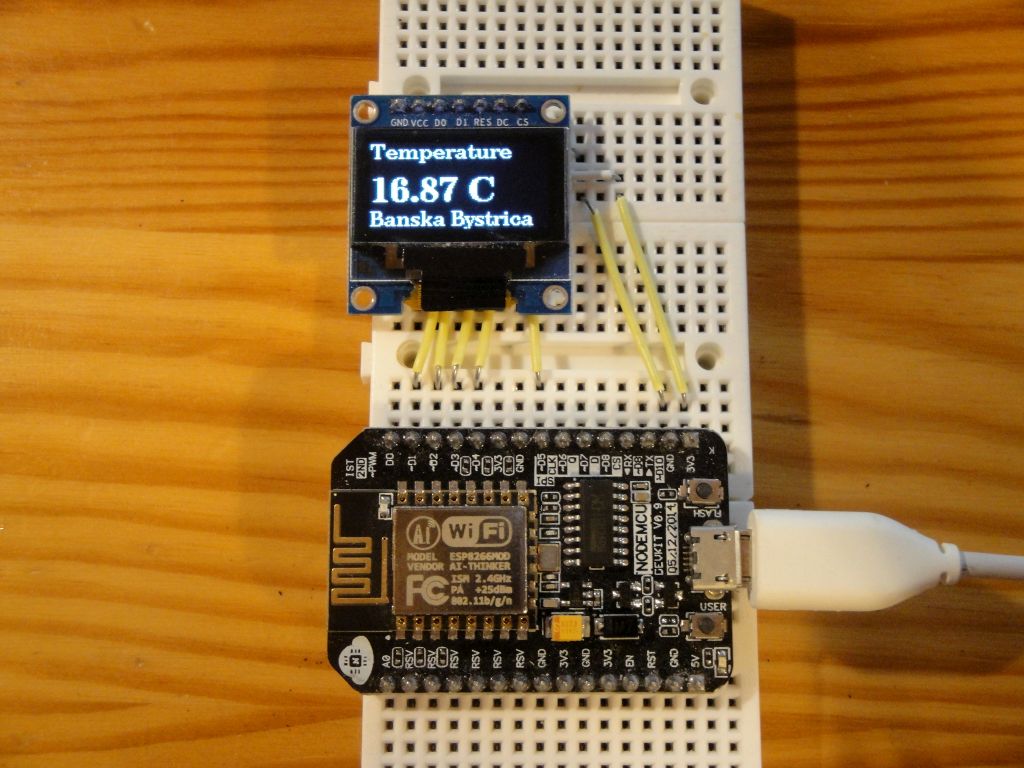
OLED displej
Posledný príklad využíva OLED displej. Na displeji rotuje niekoľko hodnôt o počasí. Program je príkladom stavového automatu, ktorý si sťahuje aktuálne údaje zo servera a rotuje ich na OLED displeji. To je zabezpečené pomocou dvoch enum. V enum oledState je stavový automat, ktorý sa stará o sťahovanie údajov zo servera. V enum temperatureState je stavový automat, ktorý sa stará o zobrazenie údajov.
V programe som použil niekoľko funkcií, aby bol program prehľadnejší.
loop- Funkcia kontroluje pripojenie k WiFi a podľa toho sa rozhoduje, či sa má zase pripojiť alebo zobrazovať údaje na OLED displeji.connectWiFi- Funkcia zabezpečuje pripojenie k WiFi.showTemperature- Funkcia raz za dve minúty stiahne nové údaje o počasi a ovláda stavový automat na zobrazenie údajov na displeji.downloadData- Funkcia stiahne zo servera nové údaje o počasí. Popis stiahnutia sa nachádza v predchádzajúcich príkladoch.drawFrame- Vykreslenie údajov na displeji. Podľa stavového automatu sa kreslí príslušná obrazovka.
Tento príklad funguje iba pre jadro 2.3.0. Jadro 2.4.1 sa nedokáže pripojiť k WiFi, akonáhle je použitá funkcia na inicializáciu OLED displeja. Nemal som dosť času na skúmanie problému, takže neviem, či je problém na strane ESP8266 alebo v knižnici U8g2.
#include <ESP8266WiFi.h>
#include <WiFiClientSecure.h>
#include <ArduinoJson.h>
#include <U8g2lib.h>
#include "arduino_secret.h"

U8G2_SSD1306_128X64_NONAME_F_4W_SW_SPI u8g2(U8G2_R0, /* clock=*/ D1, /* data=*/ D2, /* cs=*/ D5, /* dc=*/ D4, /* reset=*/ D3);
enum oledState {oledBoot, oledConnected, oledRequest, oledParsed, oledError};
enum temperatureState {tempTemperature, tempHumidity, tempPressure, tempWind};
int bootCount = 0;
temperatureState tstate = tempTemperature;
int tick = 0;

struct myTemperature {
  double temperature;
  int humidity;
  int pressure;
  double wind;
  char city[64];
};
myTemperature my_temperature;
char buff[64];

const char* host = "api.openweathermap.org";
const int httpsPort = 443;
const char* url = "/data/2.5/weather";
const char* openweathermapid = "3061186"; // Banska Bystrica
const char* openweathermapq = "Banska%20Bystrica"; // Banska Bystrica
const char* openweathermapunits = "metric"; // Celsius

//String param = String(url) +
//               "?id=" + openweathermapid +
//               "&units=" + openweathermapunits +
//               "&APPID=" + APPID;

String param = String(url) +
               "?q=" + openweathermapq +
               "&units=" + openweathermapunits +
               "&APPID=" + APPID;

String line;

void setup() {
  Serial.begin(115200);
  delay(10);
  Serial.println();
  Serial.print("connecting to WiFi ");
  Serial.println(ssid);

  u8g2.begin();

  WiFi.mode(WIFI_STA);
}

void loop() {
  if (WiFi.status() != WL_CONNECTED)
    connectWiFi();
  else
    showTemperature();
}

void connectWiFi() {
  bootCount = 0;
  WiFi.begin(ssid, password);
  while (WiFi.status() != WL_CONNECTED) {
    delay(500);
    Serial.print(".");
    bootCount++;
    if (bootCount % 25 == 0)
      Serial.println();
    drawFrame(oledBoot);
  }
  drawFrame(oledConnected);
  Serial.println("");
  Serial.println("WiFi connected");
  Serial.println("IP address: ");
  Serial.println(WiFi.localIP());
}

void showTemperature() {
  if (tick % 60 == 0) { // once per 2 minutes
    downloadData();
  }
  tick++;
  drawFrame(oledParsed);
  delay(2000);
  switch (tstate) {
    case tempTemperature:
      tstate = tempHumidity;
      break;
    case tempHumidity:
      tstate = tempPressure;
      break;
    case tempPressure:
      tstate = tempWind;
      break;
    case tempWind:
      tstate = tempTemperature;
      break;
  }
}

void downloadData() {

  // Use WiFiClientSecure class to create TLS connection
  WiFiClientSecure client;
  Serial.print("connecting to ");
  Serial.println(host);
  if (!client.connect(host, httpsPort)) {
    Serial.println("connection failed");
    drawFrame(oledError);
    return;
  }

  drawFrame(oledRequest);
  Serial.print("requesting URL: ");
  Serial.println(url);

  client.print(String("GET ") + param + " HTTP/1.1\r\n" +
               "Host: " + host + "\r\n" +
               "User-Agent: ESP8266\r\n" +
               "Connection: close\r\n\r\n");

  Serial.println("request sent");

  line = client.readStringUntil('\n');
  if (line != "HTTP/1.1 200 OK\r") {
    Serial.print("Unexpected response: ");
    Serial.println(line);
    drawFrame(oledError);
    return;
  }

  if (client.find("\r\n\r\n")) {
    DynamicJsonBuffer jsonBuffer(4096);
    JsonObject& root = jsonBuffer.parseObject(client);
    //root.prettyPrintTo(Serial);

    // parsed output
    const char* name = root["name"];
    strcpy(my_temperature.city, name);
    Serial.print("City: "); Serial.println(name);

    my_temperature.temperature = root["main"]["temp"];
    //sprintf(buff, "Temperature: %.02f", my_temperature.temperature);
    dtostrf(my_temperature.temperature, 2, 2, buff);
    Serial.print("Temperature: ");
    Serial.println(buff);

    my_temperature.humidity = root["main"]["humidity"];
    sprintf(buff, "Humidity: %d", my_temperature.humidity);
    Serial.println(buff);

    my_temperature.pressure = root["main"]["pressure"];
    sprintf(buff, "Pressure: %d", my_temperature.pressure);
    Serial.println(buff);

    my_temperature.wind = root["wind"]["speed"];
    //sprintf(buff, "Wind speed: %.02f m/s", my_temperature.wind);
    dtostrf(my_temperature.wind, 2, 1, buff);
    strcat(buff, " m/s");
    Serial.print("Wind speed: ");
    Serial.println(buff);

    const char* weather = root["weather"][0]["main"];
    const char* description = root["weather"][0]["description"];
    sprintf(buff, "Weather: %s (%s)", weather, description);
    Serial.println(buff);
  }

}

void drawFrame(oledState state) {
  u8g2.clearBuffer();
  u8g2.setFont(u8g2_font_ncenB10_tr);
  switch (state) {
    case oledBoot:
      sprintf(buff, "boot(%d)...", bootCount);
      u8g2.drawStr(0, 32, buff);
      break;
    case oledConnected:
      sprintf(buff, "connected...");
      u8g2.drawStr(0, 32, buff);
      break;
    case oledRequest:
      sprintf(buff, "request...");
      u8g2.drawStr(0, 32, buff);
      break;
    case oledParsed:
      switch (tstate) {
        case tempTemperature:
          sprintf(buff, "Temperature");
          u8g2.drawStr(0, 12, buff);
          u8g2.drawStr(0, 62, my_temperature.city);
          //sprintf(buff, "%.02f", my_temperature.temperature);
          dtostrf(my_temperature.temperature, 2, 2, buff);
          strcat(buff, " C");
          u8g2.setFont(u8g2_font_ncenB18_tr);
          u8g2.drawStr(0, 44, buff);
          break;
        case tempHumidity:
          sprintf(buff, "Humidity");
          u8g2.drawStr(0, 12, buff);
          u8g2.drawStr(0, 62, my_temperature.city);
          sprintf(buff, "%d %%", my_temperature.humidity);
          u8g2.setFont(u8g2_font_ncenB18_tr);
          u8g2.drawStr(0, 44, buff);
          break;
        case tempPressure:
          sprintf(buff, "Pressure");
          u8g2.drawStr(0, 12, buff);
          u8g2.drawStr(0, 62, my_temperature.city);
          sprintf(buff, "%d hpa", my_temperature.pressure);
          u8g2.setFont(u8g2_font_ncenB18_tr);
          u8g2.drawStr(0, 44, buff);
          break;
        case tempWind:
          sprintf(buff, "Wind");
          u8g2.drawStr(0, 12, buff);
          u8g2.drawStr(0, 62, my_temperature.city);
          //sprintf(buff, "%1.1f m/s", my_temperature.wind);
          dtostrf(my_temperature.wind, 2, 1, buff);
          strcat(buff, " m/s");
          u8g2.setFont(u8g2_font_ncenB18_tr);
          u8g2.drawStr(0, 44, buff);
          break;
      }
      break;
  }
  u8g2.sendBuffer();
}
Video
Video sa nachádza na serveri YouTube.
Zdrojový kód
Zdrojový kód sa nachádza na serveri GitHub.
Video
11.05.2018