DS18B20 Temperature sensor
Page
Stránky / Súčiastky ku Arduinu / Meranie teploty /
DS18B20 is a digital temperature sensor with a 9-12 bit resolution. Communicates with One Wire. The Datasheet with details is on the manufacturer's page. The circuit is a must for any amateur experimentator and sooner or later you will end up trying to make a small meteorological station with it.
Circuit description
A regular user buys this circuit in the TO-92 case.
- Pin1 - Here GND is connected.
- Pin2 - Data transfer. A pull-up resistor with a value of 4.7 k is required on this connector (this need not be strictly observed, and the approximate value can be used as well). The Pull-up resistor maintains the voltage at Pin2 on the logical one (when nothing happens) and the communication itself proceeds in such a way that Arduino or the sensor drops it to zero according to the One Wire protocol.
- Pin3 - Power. The power supply is in the range of 3V - 5.5V, so we connect it to 5V from Arduino.
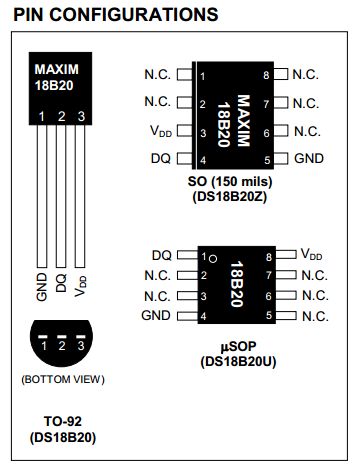
The circuit can be connected in two ways:
- External power - All three connectors are connected. Thus we connect the sensor in this example.
- Parasitic power - We will not do this, the details can be found in the datasheet. For information, just know how to save one wire and the DS18B20 takes energy through Pin2 and stores it internally in the capacitor.
Installing libraries
You need to install two libraries:
- OneWire - The One Wire Protocol itself. The library can be downloaded directly from Paul Stoffregen's site. Or install it directly in the library manager. In the libraries directory, the OneWire directory will be added after installation. There is a directory of examples, where there are several examples and one of which is also applicable to the DS18B20 sensor.
- Dallas Temperature - This is not a necessary library, but if you install it, you will be more comfortable with the sensor. The library can be downloaded from Dallas Temperature Control Library. The DallasTemperature directory will be added to the libraries directory.
Connecting to Arduino
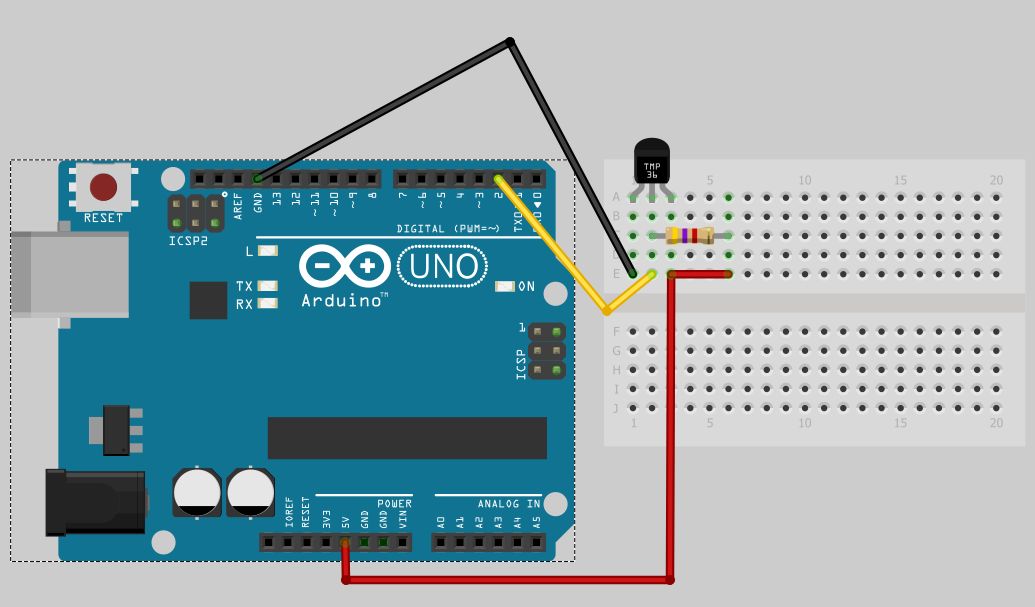
The connection is simple. Exactly according to the description of the connection. You only have to choose which digital input will read the data from the sensor. In this case, it is a digital pin 2.
What is the resolution of the measurement
Measurement resolution is inversely proportional to the time the A/D sensor needs.
| Bit resolution | Time of measurement | Measurement resolution |
|---|---|---|
| 9 | 93.75 ms | 0.5 °C |
| 10 | 187.5 ms | 0.25 °C |
| 11 | 375 ms | 0.125 °C |
| 12 | 750 ms | 0.0625 °C |
Of course, everyone will want to measure in the highest resolution and as often as possible, but one has to deal with several issues:
- It takes a lot of time.
- Too frequent measurement causes a slight warm up of the sensor.
Sensor accuracy is:
- 0.5 °C in interval -10 to 85 °C. The accuracy measurement curve can be found in the datasheet in the figure (Typical Performance Curve).
- 2 °C in interval -55 to 125 °C.
In the datasheet, you can still read that the sensor has an internal memory of 8 bytes, and of which 3 bytes are backed up to the EEPROM. There are two bytes for the alarm, which is a function that you probably will not need in amateur condition. The last byte is the configuration register in which the measurement resolution is stored.
During measurement and during write to EEPROM, the sensor needs a 1.5 mA current.
More sensors
We can also connect multiple sensors to one One Wire bus without problems. Each sensor has its unique number (address) that we communicate with.
First sensor connection
Before testing with the sensor, it is advisable to test whether the sensor is properly connected. This is a useful example that comes with the OneWire library. It's called DS18x20_Temperature.ino. The attached picture is different from the pin on which the sensor is connected. The pin 10 is used in the example.
After running, it will list all the sensors found on the serial port. In this case, for example, it wrote information about the two connected sensors.
ROM = 28 8C 6E 45 6 0 0 8A
  Chip = DS18B20
  Data = 1 A3 1 4B 46 7F FF D 10 CE  CRC=CE
  Temperature = 26.19 Celsius, 79.14 Fahrenheit
ROM = 28 49 BD 44 6 0 0 61
  Chip = DS18B20
  Data = 1 A2 1 4B 46 7F FF E 10 D8  CRC=D8
  Temperature = 26.12 Celsius, 79.02 Fahrenheit
No more addresses.
The second option is an example from DallasTemperature called Tester.ino. He writes the data in the following form.
Dallas Temperature IC Control Library Demo
Locating devices...Found 2 devices.
Parasite power is: OFF
Found device 0 with address: 288C6E450600008A
Setting resolution to 9
Resolution actually set to: 9
Found device 1 with address: 2849BD4406000061
Setting resolution to 9
Resolution actually set to: 9
Requesting temperatures...DONE
Temperature for device: 0
Temp C: 24.50 Temp F: 76.10
Temperature for device: 1
Temp C: 24.50 Temp F: 76.10
Blog
List of articles describing this temperature sensor:
- Create the DS18B20 list in the C++ array
- Candlestick chart
- Parsing output from Arduino using Node.js
- Parasite power
- ATtiny85 - Thermometer with DS18B20
- ESP8266 - Thermometer with DS18B20
- Node-RED: Arduino and DS18B20
- ESP8266 - HTTP server and temperature sensor DS18B20
- Node-RED: ESP8266 and DS18B20
Download
- DS18B20 - Programmable Resolution 1-Wire Digital Thermometer
07.09.2019