A/D converter
Page
Stránky / Arduino / Pod kapotou Arduina /
The analog-to-digital converter makes the connection between the analog and digital world in Arduino. The surrounding environment often provides an analog signal, but we cannot directly process it. We need to convert it to digital form using an A/D converter. The converter in Arduino is ten bit. This means that it can divide the analog signal into 1024 different values.
A/D converter power supply
Microcontroller ATmega328P is int the Arduino, which is powered by AVCC pin. It is connected to the same power supply as the VCC pin. In Arduino you have no way of change it, but if you design your own Arduino board, you can better separate this input from the digital part of the electrical circuit and thus achieve less noise on the A/D converter input. An example of how to connect the AVCC pin can be found in the ATmega328P microcontroller datasheet.
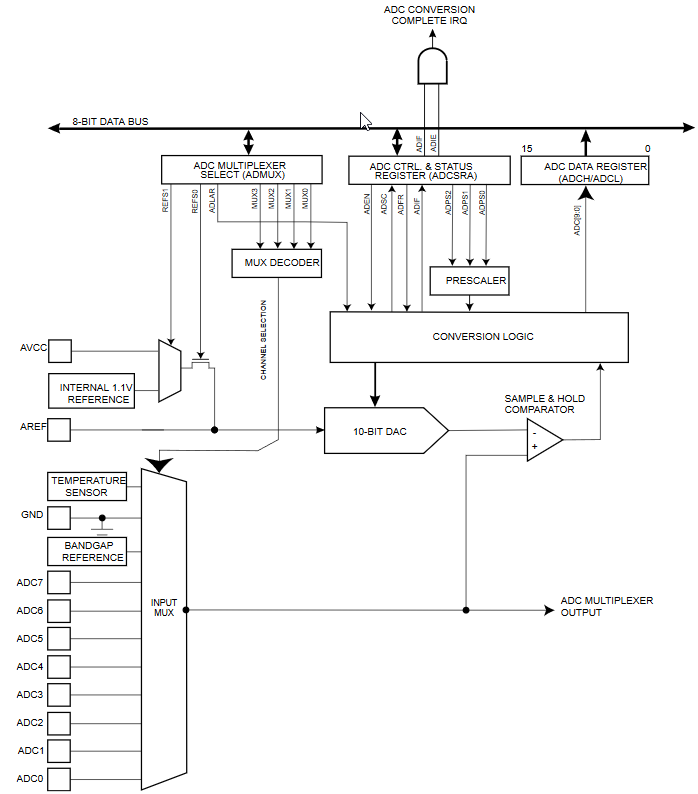
Reference voltage
The A / D converter compares the measured analog signal with the reference voltage. Arduino has the AVCC reference voltage turned on by default. This means that it measures a signal in the range of 0 - 5 V. You can set the reference voltage with the analogReference function. There are three options to choose from (some Arduino provide more options). In all cases, you first use the function to set the reference and then measure the value.
- Microcontroller supply voltage.
- Internal voltage reference 1,1 V
- External voltage reference on pin AREF.
The use of a reference voltage requires that a 0.1 µF capacitor be connected to the pin AREF. This is connected to the Arduino Uno board. On Arduino Pro Mini boards can be connected, but there are also variants that do not have it connected. The internal reference has the advantage that you do not need any additional components, but on the other hand, it varies from microcontroller to microcontroller, so it is advisable to measure it on pin AREF and use it as a constant in the program.
Functions
The following functions are used for analog measurements.
- analogReference - Setting the reference measurement.
- analogRead - Analog measurement.
- analogReadResolution - Resolution setting. Not every Arduino board has a function.
Advanced analog-digital measurement
The functions provided by Arduino are enough for normal situations. However, if you require something extra, you must use the ATmega328P datasheet and set up analogue-to-digital measurements using registers. For examples of some situations, see the following articles.
A/D converter - Internal voltage reference
If you use the Arduino analog-to-digital converter, implicitly it is set so that the reference voltage is AVCC. This default setting allows you to measure with a resolution of approximately 4 mV. You have more options to change this resolution.
A/D converter - Measurement without blocking
The function analogRead is programmed to block the microcontroller during measurement. During that time you can not do anything else. If you need to make better use of the microcontroller's time to process other tasks, it is advisable to modify the analog measurement so that it does not block the running of the program. In this example, we will write such a program.
A/D converter - Measurement with an interrupt when done
In the previous article, we have programmed an analog measurement that did not block Arduino during the measurement. The end of the measurement was checked using the bit ADSC. The end of analog measurement can also be controlled more conveniently with the interrupt that Arduino calls at the end of the measurement. In this article, we'll show you how to program it.
A/D Converter - Free Running Mode
The A/D converter has one interesting option to measure the analog signal as quickly as possible. Starting a new analogue measurement can be triggered by the end of the previous measurement. This mode is called Free Running.
A/D converter - an eight bit resolution
The A/D converter in Arduino Uno has a resolution of 10 bits. If you do not need such a large resolution, we can also use a resolution of 8 bits. This will allow us to convert the analog value to a digital value that has exactly 8 bits. This is done by adjusting bit alignment in the resulting 16-bit register. Using an 8 bit A / D conversion has the advantage that we do not have to comply with the recommended 50 kHz - 200 kHz conversion frequency and we can also use higher frequencies.
A/D converter - TL431 external voltage reference
In the articles on the A/D converter we have already addressed the internal voltage reference. The AREF pin enables us to connect external voltage reference that we can adapt to our measurement requirements. The TL431 is a component that provides us with such a reference voltage. This is a cheap piece found in a number of products. For example, in power sources, computers, or LED drivers.
ATtiny85
This microcontroller has a similar A/D converter as Arduino Uno. In addition, it has several interesting features.
ATtiny85 - A/D converter
In this article we will discuss A/D converter in microcontroller ATtiny85. We will build on previous articles in which we described the A/D converter in Arduino Uno. In this article, we will show the basic use of the converter and we will identify differences. We will discuss the differences in detail in one of the future articles.
15.02.2020