ATtiny85
Page
This is a page that serves as a signpost for experiments with a smaller version of Arduino. ATtiny85 has 8K of flash memory, 512 SRAM and 512 EEPROM. It may seem a little, but even in such a small memory you can get a pretty big program. ATtiny85 is my favorite microcontroller and only in exceptional situations I replace it with ATtiny84 microcontroller, which has more pins and a bit better peripherals.
Why use ATtiny85 instead of a full-fledged Arduino?
The main reason is the price. You can buy the microcontroller for the Euro, and when something happens, nothing happens. In addition, it is simple to made circuitry that is robust, can be connected to a higher voltage (using a voltage regulator) and you can easily control other circuits with the digital pins.
Programming
How to program ATtiny85 using the Arduino can be found in a separate article Arduino as an ISP programmer. There is also the second option that you can lay down a development board and program it using USBasp.
In order for the microcontroller to be programmed, support must be installed in the Arduino IDE. The procedure applies to IDE 1.6.4 and above:
- Use the menu function File/Preferences.
- In the dialog displayed in the field Additional Board Manager add https://raw.githubusercontent.com/damellis/attiny/ide-1.6.x-boards-manager/package_damellis_attiny_index.json and press OK. Although the core is referred to as the first, but I do not recommend using it. It was the first of historical reasons, but its author did not have much time to develop as the core, referred to in the paragraph on alternative cores.
- Use the function Tools/Board/Boards Manager.
- In the list of boards, find the attiny and install it.
Alternative cores
The previous core is good for the basic programming of ATtiny85. However, if you want to use more options of the microcontroller, it is advisable to look for more redesigned cores. They support the changing of many parameters. For example, changing fuse settings, different clock sources, and code optimization during the translation.
- https://github.com/SpenceKonde/ATTinyCore
- Into Additional Board Manager add http://drazzy.com/package_drazzy.com_index.json.
- You will also find support for many other microcontrollers in this core.
- ATtiny2313, 4313
- ATtiny24, 44, 84
- ATtiny25, 45, 85
- ATtiny261, 461, 861
- ATTiny87, 167 (with or without Optiboot bootloader)
- ATTiny48, 88
- ATTiny441, 841 (With or without Optiboot bootloader)
- ATTiny1634 (With or without Optiboot bootloader)
- ATTiny828 (With or without Optiboot bootloader)
Digital output
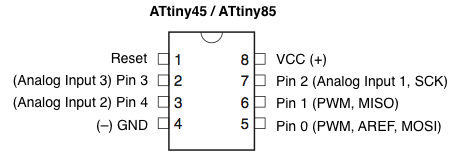
Five digital pins are available in the default settings. It is possible to switch the microcontroller to the state when it uses the last pin instead of the reset, but it is a one-time issue and it is no longer possible to program it using the Arduino. That is why we will not even take this option into account. The individual pins are controlled as follows:
- PB0(5) - digitalWrite(0, HIGH);
- PB1(6) - digitalWrite(1, HIGH);
- PB2(7) - digitalWrite(2, HIGH);
- PB3(2) - digitalWrite(3, HIGH);
- PB4(3) - digitalWrite(4, HIGH);
PWM output
There are three pins available:
- PB0(5) - analogWrite(0, 128);
- PB1(6) - analogWrite(1, 128);
- PB4(3) - analogWrite(4, 128);
Analog input
There are three inputs available:
- PB2(7) - ADC1 - analogRead(1);
- PB4(3) - ADC2 - analogRead(2);
- PB3(2) - ADC3 - analogRead(3);
There is a fourth analog pin, but it is on the same pin as RESET and its use is not easy.
ADC conversions provide more choices and those are examined in a separate article of the ADC.
Internal EEPROM
Working with EEPROM works just like in the usual Arduino. If you want to make programming easy, find the inspiration in the article on the practical use of EEPROM.
Adjusting the speed of the microcontroller
If there are no serious reasons for this, leave the microcontroller at the 1 MHz factory setting. If the speed is important, it can be switched to 8 MHz and in the case of extra speed requirements it is possible to go up to 20 MHz but only at the cost of pins 3 and 4. Speed setting is described in the article Arduino as an ISP programmer.
The information on the occupation of pins 3 and 4 is not entirely correct. There is a possibility to switch ATtiny85 into a mode that even at higher speed uses an internal oscillator. It is called PLL and can be used to achieve higher speeds. The easiest way to do this is to use the core ATTinyCore and set it in the menu. Be sure to use the menu item Burn bootloader.
Program it like Arduino?
Again what is in the previous paragraph. To add work, you can program it with low-level functions. But at ATtiny85 we have 8 kB of memory available, and it's enough for regular size programs. That's why it's much more convenient to write digitalWrite than to worry about bitwise port operations.
Only when it comes to speed or more significant memory savings, optimization techniques are needed. The old programmer's rule is that the customer does not really care how many years you've spent the program for flashing the LED. When it works, the customer will never see your source code.
Projects
List of projects with ATtiny85. If you want to program the microcontroller more, it's a good idea to build a development board. In projects, you can find the boards in the DIP design and the boards with SMD components. The LED strip dimmer was my pilot project I was learning. But surprisingly, this model of dimmer uses about 10 of my friends on my boards and an unknown number of hobbyists who have been inspired with this project.
- Development board for ATtiny85 - DIP, stripboard.
- Development board for ATtiny85 - SMD, suitable for breadboard.
- LED strip dimmer int the kitchen - DIP, own circuit board.
Blog
List of articles about ATtiny85. I wrote many articles about this microcontroller, so I tried to divide them into logical groups.
For beginners
On these pages I never wrote about Arduino directly for beginners. The reason was that there are enough examples of Arduino on the Internet that will teach you the basics of programming. With the ATtiny85 microcontroller it's different. Examples are few and difficult to find examples that would be simple enough. I'm trying to do this in this series and describe the topics and examples I do so that after reading a series of these articles a less experienced user could program these small microcontrollers.
ATtiny85 - Blink
Our baby was born two years ago and his most favourite words are the car and blink. Let's make this blink with the ATtiny85 microcontroller. The Blink program is the most basic program for Arduino, where you will learn the basics of microcontroller pins. In this article we will take over these basics and add some extras to them.
ATtiny85 - Fuses
In the previous article, I forgot to mention it. The ATtiny85 microcontroller is factory-set at 1 MHz. In this article we'll explain how to change this setting and set a higher frequency with fuses.
ATtiny85 - Buttons
Buttons are simple parts that you can use to communicate with the microcontroller. Typically, microswitches are used, which can also be found in conventional consumer electronics. In today's article we will explain the basic use of the buttons and we will program a simple state machine in which we will have to make a button debounce.
ATtiny85 - PWM
ATtiny85 has 3 PWM outputs. They are located on pins 0, 1 and 4. In this article we show how PWM is used. PWM (pulse width modulation) is an acronym for pulse width modulation of the signal by means of a change of the pulse width. It is an efficient way to control the electrical power delivered to the load. Arduino users meet this term when they control the brightness of the LED or the fan speed.
ATtiny85 - A/D converter
In this article we will discuss A/D converter in microcontroller ATtiny85. We will build on previous articles in which we described the A/D converter in Arduino Uno. In this article, we will show the basic use of the converter and we will identify differences. We will discuss the differences in detail in one of the future articles.
ATtiny85 - Blink (76 bytes)
A few years ago I wrote an article ATtiny85 - Blink. At that time I wrote a few examples and the smallest of the programs was 468 bytes long after compilation. Now we will show a program that behaves the same and has only 76 bytes. Let's make this blink using the ATtiny85 microcontroller.
- Preparing - the analog comparator.
Programming
Different ways of programming a microcontroller.
USBasp - Windows 10 driver
The USBASP programmer is used for convenient microcontroller programming. If you are using Windows 10, you will need to use signed drivers so that the programmer works. I have prepared a video for you where the entire installation procedure is explained.
The rest
Other articles that could not be categorized.
- ATtiny85-20PU
- ATtiny85 in the development of the Mosfet driver
- ATtiny85 as sound generator
- Internal pull-up resistors in ATtiny85
- ATtiny85 and rotary encoder
- Lighting RC model aircraft
ATtiny85 and supercapacitor
I tested a small 1.5 F capacitor together with ATtiny85 microcontroller. It is manufactured by Panasonic and operates at a maximum voltage of 5.5 V. The capacitor is designed for back-up of low-energy devices. I used the ATtiny85 microcontroller at 1 MHz to comply with the condition of the low-power device. Do you want to know how long the microcontroller worked?
ATtiny85 Piranha LED Lamp
The birth of the second child was an inspiration for this project. We needed a highly portable source of light to which it is possible to smoothly adjust the brightness. I took advantage of the Bambíno and ATtiny13A project and created a LED light project that is powered by a 4.5 V battery. This LED light is controlled by ATtiny85 microcontroller, but the program is also compatible with ATtiny13A.
10-bit PWM from the ATtiny85
The ATtiny85 microcontroller has two 8-bit timers. Using them can be controlled dimming of LEDs. 8 bit is not enough if you want to have a brightness change adapted to the human eye. Gamma correction causes visible jumps in brightness, especially at low brightness. The ATtiny85 microcontroller can with timer 1 produce even better resolution. In this article, we'll show you how to do it.
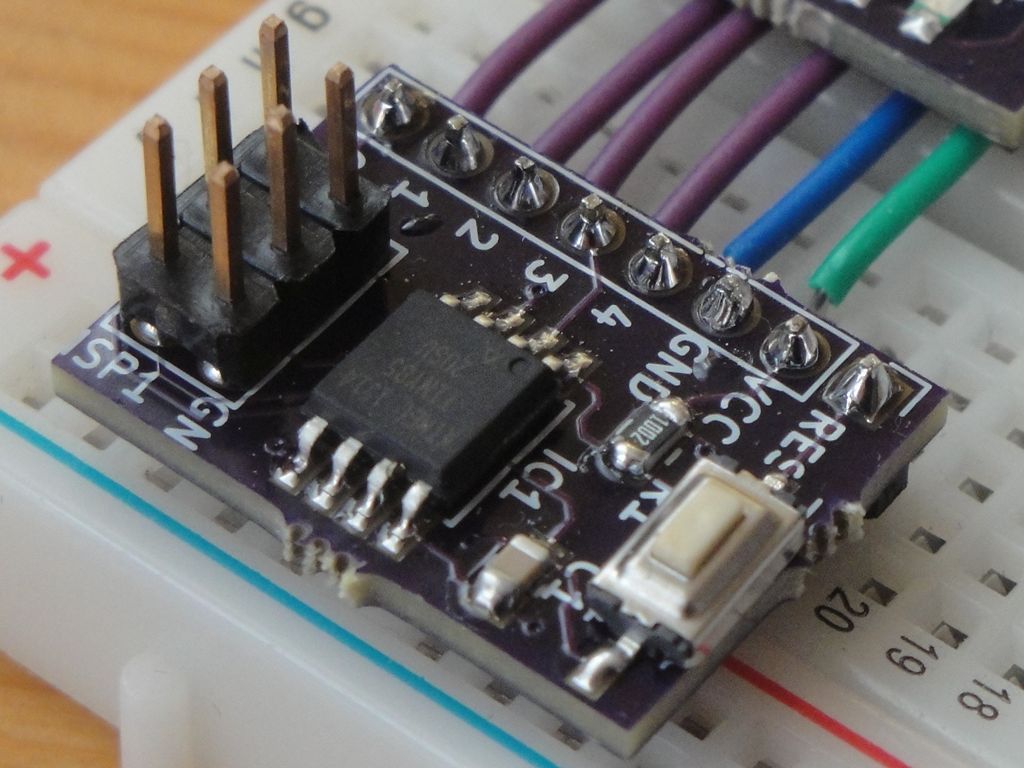
ATtiny85 development board on a breadboard
I recently introduced a SMD development board for the ATtiny85 microcontroller on these pages. In today's article I would like to show it in action. This development board has been incorporated into my other boards that I use on breadboard. I made them so that I do not need to constantly insert a large number of wire leads into the breadboard. Their quantity is reduced to a minimum. It is also visible on the illustrative photo.
ATtiny85 - Simulation of the fire using NeoPixel Ring
Two years ago, I programmed a fire simulation for Arduino Uno. In this article, we try to do this simulation using the ATtiny85 microcontroller. To prevent the program from being exactly the same, we modify the simulation slightly to set the flashing of the flame.
Cica Mica against ATtiny85
Little Petrík is no longer Bambíno and the click of the switch is no longer fun. Cica Mica came to his place, and she likes clicks on the switch.Will we repeat the success of the first box in which was the ATtiny13A? We do not know. But now I've used ATtiny85 and a refined program that randomly exchanges 4 LED sequences.
ATtiny85 and TM1637 display
For several months I am writing series for beginners on ATtiny85 microcontroller. You can use this microcontroller as a miniature Arduino replacement. But miniaturization also brings problems. The microcontroller has few pins, and it is not always possible to use a serial port on it. That's why I chose this small 7-segment display to show the simple information in the next sequel. You can easily buy the display in Chinese e-shops. To familiarize yourself with the display, it is advisable to read the article Arduino and the TM1637 display.
ATtiny85 - DS18B20 Thermometer
In this article we will describe the project of a miniature thermometer. We will use the ATtiny85 microcontroller and the DS18B20 integrated circuit. The result will be displayed on the TM1637 display. The connection is simple and the whole project can be built on a breadboard.
23.05.2021